.

where get free wifi


coffee
macdonald
Hotels 

Three easy ways to speed up Windows 10

Étape 1:  Cliquez DANS LE champion Rechercher, tapez netplwiz et appuyez sur Entrée.   
PUBLICITÉ

Étape 2:  Décochez La Case à côté les Utilisateurs doivent ENTRER ONU Nom d'Utilisateur et mot de passe versez UTILISER CET ordinateur. Puis Cliquez sur Appliquer et Entrez votre mot de passe versez approuver le changement.   
Terminé. Buh-bye, mot de passe de demarrage!

2. arrêt rapide

Si vous êtes de la vieille école comme moi, VOUS AVEZ encore Arrêtez Votre ordinateur Tous les soirs - ous à each Fois Que vous jetez Dans votre sac d'ordinateur portable et de Prendre la route.
Hélas, Dans Windows 10, le Processus d'arrêt Nécessite encore trois clics et le menu de l'ONU. Allez! 
Dans mon poste, "Commentaire éteindre RAPIDEMENT sur Windows 10," je te décris Options Plus Rapides trois. Mon préféré: le raccourci d'arrêt, Ce Qui AJOUTE Une icône d'arrêt réelle sur le bureau.  
Juste un clic droit ne importe quel espace ouvert sur ​​le bureau, Puis click sur Nouveau> Raccourci. Dans le champ Lieu Qui apparait, collez le texte suivant:
% Windir% \ System32 \ shutdown.exe / s / t 0
Ensuite, click sur Suivant et terminer la configuration de raccourci.  

3. Menu rapide demarrer

Si la machine is your age de Quelques Années (ou plus), VOUS AVEZ Peut-Etre Remarque Que Le nouveau menu de demarrer chic de Windows 10 Est prêté à apparaitre. Cela Pourrait Être Parce Qu'il est animé, et l'animation consommé chevaux.
Heureusement, You can animation Désactiver this verser Accès ONU, plus rapide versez Commencer. VOICI commentaire:
Étape 1:  Cliquez DANS LE champion Rechercher, tapez sysdm.cpl et appuyez sur Entrée.   
Étape 2:  Cliquez sur l'onglet Avancé, Puis sur le bouton paramètres Dans la section Performance.
Étape 3:  Décochez la cas Animer les fenêtres LORs de la réduction et de l'agrandissement, PUIS click sur Appliquer.  
Et ce est tout! Maintenant le Menu demarrer Doit enclencher à la Vie Un peu plus rapide. Idem verser Toutes vos fenêtres, en fait, Parce Que Maintenant Ceux qui ne will be pas animés Soit.
Avez-vous Trouvé d'Autres Façons de Donner de Windows 10, Un petit coup de pied DANS LE pantalon? Partagez vos les Conseils Dans Les Commentaires!

How to delete a hard-drive partition on Mac

Étape 1: Effacez partition

Pour commencer, ouvrez Utilitaire de disque en recherchant l'aide de Spotlight ou le trouver dans Applications> Utilitaires.   
Ensuite, cliquez sur la partition que vous souhaitez supprimer dans le panneau de gauche.
effacer-partition.jpg
Capture d'écran par Matt Elliott / CNET
Avec votre partition sélectionnée, cliquez sur le Erase bouton en haut de l'Utilitaire de disque. Cela fera apparaître une fenêtre avec un bouton Effacer. Cliquez sur Effacer et puis cliquez sur Terminé.     

Étape 2: Supprimer la partition

Avec les données effacées de votre partition, vous avez encore besoin de supprimer la partition maintenant vide afin de réaffecter son espace au reste de votre disque dur.
retirez-partition.jpg
Capture d'écran par Matt Elliott / CNET
Pour ce faire, sélectionnez votre disque dur à partir du panneau de gauche, puis cliquez sur le partage bouton en haut de l'Utilitaire de disque. Sur le graphique circulaire sur la gauche, cliquez sur le coin qui représente la partition que vous venez d'effacer. Cliquez sur le «- bouton, puis cliquez sur" Apply.   
Après une minute ou deux, Utilitaire de disque se terminer l'application des modifications à votre lecteur et juger la réussite de l'opération. Cliquez sur Fait pour compléter votre travail ici.  
partition-opération-successful.jpg
Capture d'écran par Matt Elliott / CNET

How to turn off 2 step verification in outlook


 turn off 2 step verification in hotmail

 
 turn off 2 step verification in hotmail
  • Visit https://outlook.com/ in the browser you want to authorize more permanently not to require two-step authentication.
  • Type your Outlook.com email address (or an alias for it) under Microsoft account over someone@example.com.
  • Enter your Outlook.com password over Password.
  • Optionally, check Keep me signed in.
  • Two-step authentication will be waived for the browser with Keep me signed in checked or not checked.
  • Click Sign in or press Enter.
  • Type the two-step authentication code received by email, SMS text message or phone call or generated in an authenticator app under Help us protect your account.
  • Make sure I sign in frequently on this device. Don't ask me for a code. is checked.
  • Click Submit.

How do I use a Proxy Server?

How do I use a Proxy Server?

Everybody who have used proxies to keep his own privacy in the Internet asked yourself the same question: How much anonymous this particular proxy I'm currently using? In other words whether all my personal data is hidden or only part of it.
There are many different proxy anonymity classifications in the Internet. The simpliest way is to divide all proxies into two parts. First part of proxies are completely anonymous i.e. they hide all your private information. All other proxies are non-anonymous.

Transparent Proxy
This type of proxy server identifies itself as a proxy server and also makes the original IP address available through the http headers. These are generally used for their ability to cache websites and do not effectively provide any anonymity to those who use them. However, the use of a transparent proxy will get you around simple IP bans. They are transparent in the terms that your IP address is exposed, not transparent in the terms that you do not know that you are using it (your system is not specifically configured to use it.)

Anonymous Proxy

This type of proxy server indentifies itself as a proxy server, but does not make the original IP address available. This type of proxy server is detectable, but provides reasonable anonymity for most users.

 High Anonymity Proxies

These proxy servers are called “high anonymity proxy” or "elite proxy". In contrast to other types of anonymity proxy servers they hide a fact of using a proxy:
REMOTE_ADDR = proxy IP
HTTP_VIA = not determined
HTTP_X_FORWARDED_FOR = not determined
That means that values of variables are the same as if proxy is not used, with the exception of one very important thing – proxy IP is used instead of your IP address.


core i3 vs core i5

core i3 vs core i5


There are myriad choices you need to make when you're buying a new desktop or laptop PC, but one of the most important ones is CPU. In this regard, it's important to know what distinguishes the Intel Core i3 and Intel Core i5 from one another, as these two are what you'll mostly find in the budget/mainstream desktops and laptops available today. Discounting Intel Core i7 (which are mainly found in high-performance systems) and AMD processors (another article entirely), the difference between Intel Core i3 and Core i5 can seem complicated, especially when the prices seem so close together once they're in completed systems. The easy answer is "Core i5 is made for mainstream users who care about performance, and Core i3 is made for people who just need an Intel computer," but that can be too simplistic a differentiation. We look a little deeper.

Price and Marketing
 
Intel Core i3 systems will be less expensive than Core i5 systems. Intel has moved toward a capability-driven marketing message with current-generation Core processors. Essentially, the Core i5 processors have more capabilities than Core i3 CPUs. Core i5 will be better for media creation, multitasking, and will be an improvement if you regularly complain about your PC being slow. Core i3 will be sufficient for people who want a PC that's faster than an Atom-powered tablet or laptop, but don't want to spend any more than they have to. Core i3 CPUs also tends to be less expensive than Core M processors, which focus on longer battery life and are found in slimmer, fanless form factors. Spot-checking a system like the Lenovo Yoga 2 11, you'll find a Core i5-4202Y-equipped configuration about $100 more expensive than a similarly equipped Core i3-4012Y system.

Core Confusion
 
For the most part, you'll get faster CPU performance from the Core i5 parts over Core i3. Some Core i5 processors are dual-core and some are quad-core. Most of the time, a true quad-core CPU will perform better than a dual-core processor, especially on multimedia tasks like video transcoding or photo editing. All Core i3 processor are dual core. Occasionally, you'll find an older Ivy Bridge processor like the Intel Core i3-3130M in a system that's the same price as system with a newer Haswell CPU like the Intel Core i3-4012Y. Systems equipped with the fifth-generation Broadwell processors are the newest, utilizing CPUs like the Core i3-5020U. In general, the system will last longer with the newer processor, since the older CPU doesn't have a year or more worth of improvements in it. Unless the older system is on deep discount, we recommend buying the newer processor, all other factors being equal. Within the same generation, the essential takeaway is that to get better performance in each generation, buy a processor with a higher model number (e.g., a Core i5-5020U should have generally better performance than a Core i5-4010U).

Give Me the Cache 
 
In addition to generally faster base clock speeds, Core i5 processors have larger cache (on-board memory) to help the processor deal with repetitive tasks faster. If you're editing and calculating spreadsheets, your CPU shouldn't have to reload the framework the numbers sit in. This info will sit in the cache, so when you change a number, the calculations are almost instantaneous. Larger cache sizes help multitasking as well, since background tasks will be ready for when you switch focus to another window. On currently available desktop processors, i5 CPUs have up to 6MB of L3 cache, while i3 processors have 3MB to 4MB.

Turbo Boost 
 
Turbo Boost refers to Intel's "overclocking" feature built into its processors. Essentially, it allows the processor to run faster than its base clock speed when only one or two processor cores are needed (like when you're running a single-threaded task that you want done now). Most Core i5 processors use Turbo Boost, so for example, the Core i5-4300U processor has a base clock of 1.9GHz, but when the task warrants it, the processor can dynamically clock its cores up to 2.9GHz. Core i3 processors don't feature Turbo Boost.

Hyper-Threading 
 
Intel Hyper-Threading uses multithreading technology to make a processor appear to have more cores than it physically has to the operating system and applications. Hyper-Threading is used to increase performance at multithreaded tasks, such as a user running several programs simultaneously, but there are other tasks that take advantage of Hyper-Threading, like multimedia operations (transcoding, rendering, etc.) and Web surfing (loading different elements like Flash content and images simultaneously). Core i5 uses Hyper-Threading to make a dual-core CPU act like a four-core chipset, but if you have a Core i5 processor with four true cores, it won't have Hyper-Threading. For the time being, Core i5 tops out at handling four streams, either using four real cores or two cores with Hyper-Threading. All Core i3 models support Hyper-Threading; in these cases they are dual-core processors that can handle four threads.
Integrated Graphics
The Westmere generation of Core processors introduced Intel HD graphics, integrated graphics built into the processor core itself. Previous Intel integrated graphics were built onto the motherboard chipsets, rather than on the processor. You'll find DX10-compatible Intel HD Graphics 2000/3000 in older Sandy Bridge processors, and DX11-compatible Intel HD Graphics 2500/4000 in older Ivy Bridge processors. Haswell-based processors have DX11-compatible Intel HD Graphics 4200/4400/4600/5000 and Iris 5100 graphics, and Broadwell-based processors have Intel HD Graphics 5500/6000 and Iris 6100 graphics. The same numerical rules apply, so Intel HD Graphics 4000 performs much better than Intel HD Graphics 2000. You'll find some version of Intel HD graphics on Core i3 and i5 processors, depending on the part number. Intel Iris 6100 is the current top dog for Core i5, and will let you play 3D games at low to moderate settings, depending on the game.
In the grand scheme of things, Core i5 processors will get you better performance overall than Core i3 processors. Sometimes, however, the reverse is true. With the myriad different models out there, your best bet will be to check out each system's performance numbers before making your purchase decision. We can help here, too, with our laptop and desktop reviews.

Best 3 apps android this week on google play

best android apps this week

Modern Combat 5: Blackout

Cover art 

Download free 


Despicable Me

Cover art 
 

Download free  


MORTAL KOMBAT X

Cover art
Top Developer


How to reserve your free upgrade to Windows 10

Microsoft will release Windows 10 its next generation operating system PC's, Tablets and Mobile devices this July 29th 2015. Windows 10 will be free for the first year to all Windows 7, Windows 8.1 and Phone 8.1 users. In this article, we take a look at how Windows 10 will be distributed and how you can reserve your copy today.
 
Windows 10 will be free for the first year to all Windows 7, Windows 8.1 and Phone 8.1 users.
Image
Wow, thats cool, but does that mean, I will have to pay for Windows 10 after the first year?
No. Its a promotion to get as many users to upgrade their existing Windows 7 PCs and Windows 8.1 devices to Windows 10. Once you upgrade, its yours forever at no additional cost. As Microsoft Program Manager for Windows Terry Myerson described it:
This is more than a one-time upgrade: once a Windows device is upgraded to Windows 10, we will continue to keep it current for the supported lifetime of the device at no additional charge.
Source: http://blogs.windows.com/bloggingwindows/2015/01/21/the-next-generation-of-windows-windows-10/
The first thing you will need to ensure is you have the latest Windows Updates installed.
Windows 7 users should ensure they have Service Pack 1 or later installed.
Windows 8 users should ensure they have Windows 8.1 with Update 1 installed or later.
For Windows 8.1, see the following article:
http://windows.microsoft.com/en-us/windows-8/install-latest-update-windows-8-1
For Windows 7, see the following article:
http://windows.microsoft.com/en-US/windows7/learn-how-to-install-windows-7-service-pack-1-sp1
Backup your computer:
When making significant changes to your computer such as updating the operating system, you should always backup. See links to resources about backing up by clicking the link for the respective version of Windows you are running: Windows XP, Windows Vista, Windows 7, Windows 8/8.1
Also review:
How to manually backup and restore your files
How to: 10 Tips before installing the latest Windows 10 build
How to: 10 things to do if Windows 10 Setup fails.
How to: Determine if an application or hardware device is compatible with Windows 10
Once you have installed these important updates and followed the prerequisite instructions, you should be ready to receive your free update to Windows 10 this summer.
How will I know when Windows 10 is available?
Between now and launch, the following KB update (https://support.microsoft.com/en-us/kb/3035583)  should be installed on your Windows 7/8.1 computer. Volume License customers will not receive this update because of IT requirements in managed environments. If its not already installed, open Windows Update and check for Updates.
Image
To check if the updates already installed:
Click Start (or press Windows key + S for Windows 8.1 users)
Type: view installed updates
Hit Enter on your keyboard
Look through the list for the KB3035583 update.
Once that is installed, you should see the following pop up in the Notification area of the Taskbar.
Image
Double click the Windows icon to learn more.
Image
The Get Windows 10 app will provide with a tutorial of how the reservation works. Click the Reserve your free upgrade.
  • Reserve FREE upgrade to Windows 10 now. It will download* once available, and you can cancel your reservation at any time.
  • You'll get a notification after Windows 10 is downloaded to your device. Install it right away or pick a time that's good for you.
  • After it's installed, Windows 10 is all yours.
Learn more: How to install the latest Windows 10 build from within Windows 8.1 or Windows 7
You can go through the slideshow to learn more about the new features offered in Windows 10:
Image
Windows 10 reintroduces the Start menu, with improved support for mouse, keyboard and touch.
Image
Windows 10 includes improved performance, better productivity tools, better software and hardware compatibility.
Image
Cortana, a new feature in WIndows 10 makes it easy to find files on your PC, Network and information on the web. The digital assistant can help you track a package, check flight information, find the name of a song or find out movie times. You can even ask Cortana questions.
Image
Windows 10 includes a much improved Store where you can find not only apps and games, but also media such as Music, Movies and TV shows.
Image
When you are ready, just click the Reserve your free upgrade and Windows 10 will be yours this summer.
Image
What are the official upgrade paths to Windows 10?
Microsoft revealed in a Channel 9 Video the official upgrade paths to Windows 10:
Image
Windows XP and Windows Vista users will have to do a clean install from a .ISO, so will Windows 8.0 users.
Source: http://channel9.msdn.com/Events/WinHEC/2015/OWD100
  • Users of older versions of Windows such as Windows XP and Windows Vista will have to purchase a full retail upgrade and perform a custom install.
  • Windows 8.0 customers will have to download the Windows 10 .ISO file and perform a local in place upgrade. How to: upgrade from previous versions of Windows using Windows 10 ISO file
  • The edition of Windows 10 installed will be based on the logical edition of Windows installed, ie. Windows 8 Core (Single Language) will be upgraded to Windows 10 Home, Windows 7 Professional will be upgraded to Windows 10 Pro.
  • The free upgrade does not have the option to switch architectures, so the architecture will remain the same. If you want to switch architectures, you will have to download the Window 10 .ISO file in the appropriate architecture (32 or 64 bit) and do a custom install.
How to: Switch from 32 bit versions of Windows to Windows 10 64 bit
How to: Do a custom installation of Windows
  • Volume License customers running Windows 7 Enterprise or Windows 8/8.1 Enterprise or volume license editions of Windows 7 Professional or Windows 8/8.1 Pro do not qualify for this offer.
Will I be able to upgrade from the Windows 10 Insider Preview to the final release?
How to upgrade from the Windows 10 Insider Preview to Windows 10 RTM build
Can I do a clean install using the Free upgrade?
No, it will require that you are running a previous qualifying version and start the upgrade from within the qualifying version. You can initiate a clean install after completing the Upgrade.
Please be aware that you cannot use the free upgrade offer to perform a clean install on first attempt. You must first upgrade from the qualifying version of Windows 7 or Windows 8/8.1 (whether you do it through Windows Update or using the .ISO file). Ensure the upgrade is completed successfully and then ensure that it is activated. You can then proceed to do a clean install by using recovery media or using the Reset function in Start > Settings > Update & Security > Recovery > Reset this PC (Get Started).
See: 
How to: Perform a clean install using Reset this PC in Windows 10
How to: Create a Recovery Drive for reinstalling Windows 10
Can I choose a different language during the upgrade?
Cross language upgrades are not supported, the free upgrade will be installed in your local language. In fact, you should uninstall any language packs before upgrading.
For example, if the default language your copy of Windows 7 Ultimate was installed in is French and you added a English Language Pack; you will need install a language pack for English after setup is complete if you are upgraded to Windows 10 Pro. If you have Windows 10 Home installed you will need to install the Windows 10 Pro Pack ($99) using Add Features (Windows key + X > Control Panel) then download the English Language Pack.
Which languages will Windows 10 be available in?
Arabic (Saudi Arabia), Bulgarian (Bulgaria), Chinese (Simplified, China), Chinese (Hong Kong), Chinese (Traditional, Taiwan), Croatian (Croatia), Czech (Czech Republic), Danish (Denmark), Dutch (Netherlands), English (United Kingdom), English (United States), Estonian (Estonia), Finnish (Finland), French (France), French (Canada), German (Germany), Greek (Greece), Hebrew (Israel), Hungarian (Hungary), Italian (Italy), Japanese (Japan), Korean (Korea), Latvian (Latvia), Lithuanian (Lithuania), Norwegian, Bokmål (Norway), Polish (Poland), Portuguese (Brazil), Portuguese (Portugal), Romanian (Romania), Russian (Russia), Serbian (Latin, Serbia), Slovak (Slovakia), Slovenian (Slovenia), Spanish (Spain, International Sort), Spanish (Mexico), Swedish (Sweden), Thai (Thailand), Turkish (Turkey), Ukrainian (Ukraine)
Additional languages available as Language Interface Packs
http://www.microsoft.com/en-US/windows/windows-10-specifications
I am on a slow connection, what options do I have?
How to: Upgrade to Windows 10 if you are on a slow or metered Internet connection?
Do unused Windows licenses qualify for the free upgrade to Windows 10?
No. In order to qualify for the free upgrade, Windows 7 or Windows 8.1 with Update 1 must be installed and running. Unused licenses do not qualify.
Will I have the option of choose a different drive or partition where I want the upgrade installed?
No, it will require that you are running a previous qualifying version and start the upgrade from within the qualifying version.
I am dual booting with another edition of Windows, will upgrading affect the other installation?
No, it will not affect the other operating system, only the version of Windows from which the upgrade is initiated will be replaced.
Will upgrading to Windows 10 affect other drives or partitions in my computer?
No, only the drive where the upgrade is initiated from will be affected.
Can I switch to a different edition using the Reservation app?
The edition of Windows 10 installed will be based on the logical edition of Windows installed, ie. Windows 8 Core (Single Language) will be upgraded to Windows 10 Home, Windows 7 Professional will be upgraded to Windows 10 Pro.
Learn more: What are the editions of Windows 10 available?
If you want to switch from ie. Windows 7 Home to Windows 10 Pro, you will have to purchase a Pro Pack for $99 using the Add Features wizard in Control Panel. You won't have to install it from scratched, the Add Features wizard will unlock the edition.
I want to dual boot instead of replace my current version of Windows.
If you need to install Windows 10 on a separate hard disk or partition, you will need to purchase a full license.
Retail pricing information:
Edition Pricing
Windows 10 Home US $119
Windows 10 Pro US $199
Windows 10 Pro Pack US $99
Source: https://www.microsoft.com/en-US/windows/windows-10-faq
Do I have the option of delaying the download?
You can configure Windows Update to check for updates but let you decide when to install them to avoid having the upgrade download automatically.
Do I have the option of choosing when to install the Windows 10 upgrade?
Image
  • Reserve your FREE upgrade to Windows 10 now. It will download* once available, and you can cancel your reservation at any time.
  • You'll get a notification after Windows 10 is downloaded to your device. Install it right away or pick a time that's good for you.
  • After it's installed, Windows 10 is all yours.
  • Learn more about how the update works: How to install the latest Windows 10 build from within Windows 8.1 or Windows 7
Troubleshooting
If the Reservation application (Windows 10 app) has a blank screen or does not work or is not available:
Please be aware even if you do not get the Windows 10 app, you can still download Windows 10 as a .ISO file, create a bootable copy and upgrade your system.
How to: upgrade from previous versions of Windows using Windows 10 ISO file
  1. Check Windows Update for an updated version of KB2952664 (Windows 7 SP1) or KB2976978 (Windows 8.x)
  2. After installing the Windows Update, re-run the Compatibility Appraiser. This will happen automatically within a day or it can be run manually from an admin command prompt:
    • schtasks.exe /Run /TN "\Microsoft\Windows\Application Experience\Microsoft Compatibility Appraiser"
Once started, it may take 10 minutes or so for the appraiser to complete. Once complete, re-open the Get Windows 10 app and it will have the updated compatibility information. Restart your computer and try again.  Dan Charlton - Windows DirectX Graphics team
If the above does not work, try uninstalling both updates:
Press Windows key + X (for Windows 7 click Start, type: cmd then right click cmd and click Run as administrator)
Click Command Prompt (Admin)
At the command prompt, enter the following commands:
wusa /uninstall /kb:3035583
wusa /uninstall /kb:2952664

Exit the command prompt, restart and run Windows Update again.

Enable desable WiFi in Windows 8

ou take your new Windows 8 PC to a coffee shop. You’ve just set up wireless Internet at home. Or you’re one of the lucky ones who has Wi-Fi on a plane. So how do you connect to and manage your laptop’s Wi-Fi connections from Windows 8?

In the past, you’d click on the connection icon in the lower-right corner (this group of icons is called the Notification Area). Then, you’d choose a wireless network and connect from there.
Luckily, you can still do that in Windows 8. Just press Windows + D to go to the Windows 8 desktop, and you should see the familiar connection icon in the lower right. Click on it, and you’ll see a brand-new pane slide into view from the right side.

Enable WiFi Connections
This is the connection pane.
But what if you’d like to manage wireless connections from the Start Screen? Here’s how to do that.
  1. Press the Windows Key to go to the Start Screen
  2. Move the mouse to the bottom-right corner to see a few icons start to appear. Then move the mouse upward. These set of icons are called the Charm Bar
  3. Click Settings
  4. Click the Network icon. You’ll see the same pane as above slide into view

Enable WiFi Connections
Click the Network icon.
At the top is Airplane Mode. Those with a smartphone or tablet will be familiar with this setting. It disables all Wi-Fi connections and saves a lot of battery life … useful when your laptop is aboard a plane that doesn’t have Wi-Fi, or for landing and take-off. Also, you don’t have to use Airplane Mode when on a plane. There are lots of times where you’ll want to turn Wi-Fi off … such as when you’re connected to the Internet via cable.
Next up is your Connections. Here you’ll see an icon with a cable next to it if you’re connected to a hardline, or a series of bars if you’re connected to Wi-Fi. The shaded bars show your connection strength, with five being the highest.
Below that are the Wi-Fi connections available in your area. Find the one appropriate to you and click on it.
If you can select the Connect Automatically check box, your PC will connect to that source every time it’s in range. Then, click Connect. You may need to enter a password, depending on the connection.

Enable WiFi Connections
You can choose to connect automatically.
You can also disconnect from Wi-Fi or connect to a different location from this same screen.

Customizing the Windows 10 Start Menu

Customizing the Windows 10 Start Menu


Start menu in Windows 10, or you may hate it. But it actually doesn’t matter how you feel about it; you can expand it, shrink it, customize it, or get rid of it altogether.
Here’s the complete list of things you can do to the right side of the Start menu — and the left side.
Customizing the Windows 10 Start Menu

Right Side

Expand it: Drag the top or right edge, using the mouse or trackpad. It snaps bigger or smaller. (It doesn’t work with a finger on a touchscreen.)
Make it fill the entire screen: Right-click anywhere on the desktop. From the shortcut menu, choose Personalize. On the Settings screen, click Start, then turn on “Use Start full screen.”
In this mode, the left column of the Start menu is hidden. The live tiles area fills your entire desktop (which is handy for touchscreens).
Move a tile: With the Start menu open, drag a tile to a new spot.
Resize a tile: Right-click the tile. From the shortcut menu, choose Resize. You always have a choice of Small and Medium; some apps offer Wide or Large options, too.
image
Add new tiles: Right-click any folder, disk, or app. From the shortcut menu, choose “Pin to Start.”
(Or open the “All apps” list, and right-click an app’s name there.)
Its tile now appears at the bottom of the right side of your Start menu.
Make a tile stop blinking: If you’d rather silence the animation of a “live tile,” right-click it. From the shortcut menu, choose “Turn live tile off.”
Remove a tile: Open the Start menu. Right-click the tile you want to eliminate. From the shortcut menu, choose “Unpin from Start.” (You’re not actually discarding that item — you’re just getting its tile off the Start menu.)

Eliminate all tiles: Right-click each tile; choose “Unpin from Start.” Repeat until you’ve eliminated all the tiles. Now only the left-hand column remains, just as it was in Windows 7.
Change the color: Right-click anywhere on the desktop. From the shortcut menu, choose Personalize. In Settings, click Colors. You can change both the tile colors (“Accent color”) and the background of the Start menu and taskbar (“Show color on Start, taskbar, and action center”).

Left Side

Add new items: You can’t.
Remove items: You can remove listings in the “Most used” section — handy if you’re embarrassed about something that shows up there. To do that, right-click its name. From the shortcut menu, choose “Remove from this list.”

7 awesome paid iPhone apps on sale for free right now

8 awesome paid iPhone apps on sale for free right now
iphone-6

Happy Thursday! Today we’ve rounded up yet another set of eight paid iPhone apps that are completely free to download right now for a limited time. Let’s check them out below!
MUST READ: Why do I still use Android?
These are paid iPhone and iPad apps that have been made available for free for a limited time by their developers. There is no way to tell how long they will be free. These sales could end an hour from now or a week from now — obviously, the only thing we can guarantee is that they were free at the time this post was written. If you click on a link and see a price listed next to an app instead of the word “get,” it is no longer free. The sale has ended. If you download the app, you will be charged.

AppBox Pro

app-box-pro
Normally $1.99
AppBox Pro turns your iPhone, iPod Touch or iPad into a manager of personal data.
This powerful, sleek new version of AppBox Pro helps you easily create, browse, organize and edit your private information including new categories such as video and software licenses, events, shopping list, cycle calendar for women and more in minutes with just a few taps. AppBox Pro has been designed exclusively for the iPhone, iPod Touch and iPad.
AppBox Pro 3.0 is updated with a stunning new design and improved performance. It is easier to use, faster and more efficient than ever!
Start with one of 20 well-designed apps for your expenses, loans, anniversaries, travel and more.
Choose from over 350 powerful functions. Just tap to add budgets, events or confidential information. Touch and drag your finger to reorder. And with recent optimizations, AppBox Pro is quicker and smoother than ever before.
Turn on iCloud so your personal data is kept up-to-date across platforms and automatically available on all your devices.
Get started
– Use the slide navigator to quickly select an app
– Customize your app using Theme colors
– Turn Passcode on to secure your valuable data
– Use Favorites to quickly navigate your commonly used apps
– Quickly and easily share your data via AirDrop, Mail, Messages, Twitter or Facebook
Intelligently create
– 19 fully customizable, built-in categories and templates to securely store bank information, credit cards, membership numbers, accounts, photos, video and more in Wallet
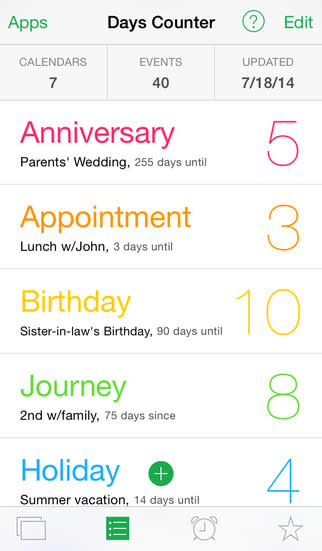
– 6 Customizable built-in calendars; count days from event dates and use slideshow in Days Counter
– Easily manage your budget and checklist in Expenses List
– Track periods for multiple women’s accounts; check the average and trends from charts in Ladies Calendar
Innovative conversion tools
– 167 currencies in Currency Converter
– Solar/Lunar Calendar Converter ~1901 to 2042
– Work with 53 languages and listen to 42 languages in Translator
– 17 categories & 358 units in Unit Converter
Discover
– Explore 98 countries’ holidays
– Enjoy the amazing background photos of different locations around the world
Advanced calculate
– Basic/Scientific Calculator
– Date Calculator
– Loan Calculator
– Percent Calculator
– Sales Price/Tax Calculator
– Tip Calculator
– Compare Unit Price
Powerful utilities
– Battery Status and Device Information
– Gorgeous new Clock including waves, flip and digital theme
– Use Magnifier with brightness, flashlight, invert or zoom and snap a picture of any object
– Use Mirror with flip horizontal, photo effects or zoom and snap a picture of your face
– LED Flashlight
– Random number generator
Download AppBox Pro

Money Tracker

money-tracker
Normally $4.99
Manage your Personal Finance (Income/Expense) Any Time, Any Where with Money Tracker. Download now!!
Take control of your personal finance and make your life simple and financial hassles free.
—————— Best Features ———————
√ Make your own categories of income and expenditure sources
√ Worldwide currency list: Manage all expense in your home currency
√ Interactive graphical charts of your expense and income for perfect forecasting
√ Easy & more realistic Bank accounts Setup with Account number & Branch Name
√ View and email Bank statement in PDF and HTML Format
√ Upcoming expense lets you know about where you would spend in future
√ Upcoming income tells the source of your future income
√ Add income/expense category by your preference
√ Built-in Catchy logos to use while making income/expense category
√ Professional Design with easy to use interface
—————————————————–
The aim of this app is to make it easy to manage and keep track of your income and expense and allows you to make a proper budget. So what are you waiting for, Download Money Tracker and enjoy financial peace in your life
Download Money Tracker

CameXtra+HDR

camera-xtra-hdr
Normally $1.99
** For newest pictures and video for this app please use App Store app ***
• Third party app discovery apps have old pictures.
√ HDR photography for most difficult lightings.
• You can adjust the input pictures, such as fusion.
• You can save input pictures taken for HDR separately and load them later. When you open the photo library screen, tap on the title.
√ Manual controls over exposure, focus, white balance and colour tint, and many more.
√ Video recording with ability to pause.
• You can also merge your videos from the photo library.
When you open the photo library screen, tap on the title.
√ High resolution picture quality for preview, when in edit mode.
• You can see true pixel quality of a photo when you zoom, in edit mode.
√ It has an easy to use reality slider control which is not limited to the device width, let’s you easily select different values with a wider distance.
Othe Camera features :
• Wide distance slider control.
√ Timer with consequent number of shots and warning flash.
√ Camera burst mode captures up to 30 frames per second in 1920 x 1080 pixel.
• You can make collage photos out of your videos.
√ Stabilizer ( anti shake ).
√ All effects and editing functions are available in camera preview mode ( live ).
√ Flash modes and flash light.
√ Photography golden lines guides and level line.
√ Low battery consumption.
√ Zoom in camera view and when editing photos.
Other Editing features :
√ You can enhance quality of your videos and apply colour effects.
• Photo editing functions and colour effects are available from your device Photo app and Camera app.
√ Professionally designed artistic color effects.
√ Powerful shadows and brightness filters, which brightens dark areas.
√ On tap pictures enhancement based on many scene modes.
√ Enhance in details using shadows, brightness, contrast, hue, saturation, sharpness and vignette.
√ Depth of field and tilt shift. Plus black & white mode instead of blur.
√ Mono color effects and posterize.
√ Adding GPS information to pictures and view picture detail data.
√ Crop and rotate picture.
√ Quick and fast one place shoot and edit.
√ Very low battery consumption when editing pictures.
Sharing :
√ Instagram, Twitter, Facebook*, Flickr*, Email and many more.
* Facebook and Flickr sharing requires their relative apps be installed on your device.
Download CameXtra+HDR

LiquiPad

liquipad
Normally $0.99
LiquiPad is an addictive visual toy that turns the surface of your iPhone into several different virtual liquids that respond to and interact with your touches. As relaxing as it is entertaining, LiquiPad is also a non-demanding way to keep your mind visually stimulated while listening to music, audiobooks, the in-laws, etc. And, of course, it’s a great way to show off the incredible power of your iPhone. Use any of the 12 built-in themes, or use your own photo library for limitless possibilities.
Using LiquiPad couldn’t be simpler. Tap or slide your finger(s) across the screen to create and manipulate the waves.
Or, tap the gear icon in the lower left to open the settings menu.
LiquiPad must be seen in motion to be believed. There are numerous videos posted online. Search for ‘LiquiPad’ on YouTube.
Tip: If you would like to take a screenshot, you can do so by pressing the home and sleep buttons at the same time. The screen will flash, and the image is saved to your Photo Library.
FEATURES:
– Stunning high-resolution graphics take full advantage of iPhone 4’s Retina™ Display
– Intelligent, speed-sensitive multi touch support
– 12 Beautiful Themes, with infinite themes possible using your own Photo Library or the Camera
– Control over liquid density – make it act like Water, Oil, Syrup, or Gel
– Automatic Wave Generators, such as rain, for use as an animated photo display
– Optional Tilt mode using the iPhone’s accelerometer.
– Realistic Liquid sound effects
Download LiquiPad

Simple Copy Paste

simple-copy-paste
Normally $1.99
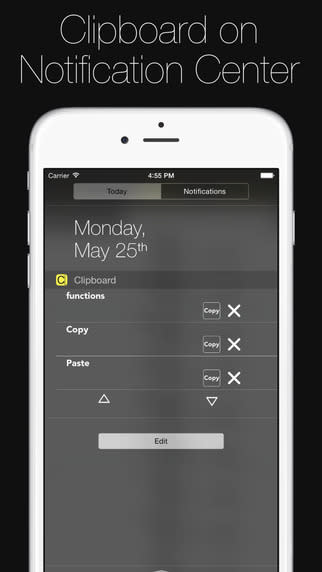
Control your clipboard.
Copy and Paste easily.
Keep your clipboard synchronized with all your devices* with iCloud.
Just add the Clipboard widget to your Notification Center, copy a word or a text and look at the widget**.
The text or word will be available in Simple Copy Paste in all your devices*.
Simple Copy Paste does not contain Ads.
And also:
– Search bar;
– Reorder in alphabetical order or by date.
– No in-app purchases.
If you need more functions, you can buy Copy Paste Pro, that also has:
– Capitalize, uppercase, lowercase and other 3 functions directly from the widget;
– Rearrange buttons;
– Blacklist: Put on the Blacklist words or beginning of words(like 3 letters) that you don’t want to save.
*Devices with iOS 8 or superior using the same iCloud account and with iCloud Drive enabled.
**The text or word copied will only be available in the app if you open your Notification Center with the Clipboard widget enabled or open the main app after copy something.
****Be Careful with your sensitive data. The widgets are also available when the screen is locked.
Download Simple Copy Paste

StepIt

stepit
Normally $0.99
Tell your story with StepIt. Create directions, give advice, or tell a joke. Be cute, be informative, or be funny. Pick a background, upload your own image, or change colors. Once your finished, sharing your amazing StepIt with the world is only a tap away. Thousands have enjoyed creating beautiful StepIts; start creating yours today.
What you get with StepIt:
-Beautiful imagery: Add your personal touch using photos from your own library, or choose from a hand-picked selection from Pixabay.
-Change Colors: Change the colors that highlight your StepIt, and make your creation standout.
-Sharing Galore: Once your StepIt is finished, effortlessly share through countless sources.
Download StepIt

GrooveMaker 2

groovemaker-2
Normally $9.99
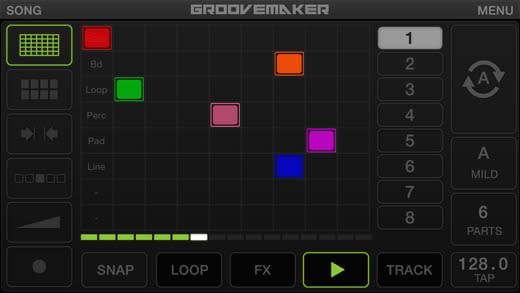
GrooveMaker® 2 is the latest version of the revolutionary iPhone/iPad/iPod touch app designed for creating non-stop electronic, dance and hip-hop tracks in real-time. Now anyone can get results that sound like they were made by a professional DJ every time!
GrooveMaker 2 works with pre-arranged sets of loops (called “Songs”) that always sound good together. You can remix them in limitless ways with our patented “groove generator” technology.
In addition to its touchscreen interface, GrooveMaker 2 now supports a number of powerful new control options. The latest version introduces full support for iRig® Pads, IK’s powerful new ultra-portable pad controller. Plug your iRig Pads into your iOS device of choice and you’ll be able to take advantage of its custom GrooveMaker 2-specific modes — Groove Mode and Launch Mode — that let you control groove length, browse through loops, tweak effects, trigger Randomixes and a whole lot more. Alternatively, you can also enjoy touchless control with your iRing™ motion controller.
Select a Song and you’ll enter the Grid interface. Push the Randomix button, and you will see the building blocks of your groove appear and the music will start playing. You can change grooves with the Randomix function or literally “draw” new grooves directly on the grid. You can lock loops, solo and mute, change volume, pan and freely associate loops with each of the 8 available tracks.
Enhance your grooves with the Effects interface. You get 16 high quality effects: Filter, Delay, Flanger and more. You also get highly creative effects like Twist, Brake and Spin that can only be found on sophisticated professional DJ gear. You also have a Master section where you can add a finishing touch to your groove with a Compressor, an EQ and a Filter.
GrooveMaker Packs offer over 6,500 loops. They come grouped as “Song” packs that are each organized by categories such as bass drum, loop, bassline, pads and percussion. There are 100 collections available that feature styles like House, Dubstep, Hip-Hop, Techno, Trance, Electro, D’n’B, Reggae, Reggaeton and Rock. There are even artist packs from Ace of Skunk Anansie, Chris Domingo and Cool & Dre.
GrooveMaker 2 features:
• Intuitive interface
• 23 Packs available in 100 song collections including styles like EDM, Dubstep, House, Hip Hop, Techno, Trance, Electro, D’n’B, Reggae, Reggaeton and Rock plus artist packs (4 built-in Songs plus 23 packs available for in-app purchase)
• iRig® Pads support: select tracks, cue loops, control effects, change length, tweak effects, trigger Randomix and more with the fully customized native support of two GrooveMaker-specific MIDI maps
• iRing™ support: control effects, parts and Randomixes with the iRing motion controllers
• Matrix interface for simplified loop remixing by drawing
• Flexible management of the Randomix algorithm
• Single loop duration can be freely set
• Groove duration can be freely set from 1/2 bar to 8 bars with new 1/4 to 1/32 live loop functions on saved grooves
• 16 FX with automation and touch pad-like interface (10 Filter FX built-in plus 6 more available for in-app purchase)
• IMPORT functions allow you to easily import or record in your own audio files for use
• High quality time stretch for seamless tempo variation from 50% to 200% of the original BPM
• Real time recorder
• Master control with Compressor, EQ and Filter
• Share via Audio Copy, E-mail, Wi-Fi, FTP or SoundCloud
• Compatible with Audiobus, Inter-App Audio and X-Sync
Download GrooveMaker 2

Respond to calls with text messages in iOS

Pro tip: Respond to calls with text messages in iOS
Have you ever been in the middle of a call, only to be interrupted by another call coming in? It can be annoying, especially as the other caller hears the "buzz" of the iPhone silent ringer. Sure, you could enable Do Not Disturb mode before making your first call, but why not do something a little more reactive instead? Let's take a look at how to set this up so that you can easily send a message with one tap to a caller to let them know if you're busy or on another call.

Setting up call messages

By default, iOS 8 comes with a few reply messages pre-populated into the software. However, if you want to customize the messages that are available to you, simply follow these steps:
  1. Open Settings | Phone | Respond with Text
  2. Type in your messages into the Respond With fields (Figure A)
Figure A
Figure A
Type in a message that will be displayed to incoming calls.
Note: You can type up to three different messages in this area. You'll be able to choose between these three messages with only a single tap when you receive a phone call.
The default messages are: "Sorry, I can't talk right now," "I'm on my way," and "Can I call you later?" However, you can make these messages say anything you want.

Replying with messages to callers

Whenever you receive a call, there are two buttons above the "Slide to answer" control (Figure B). One of those buttons is Remind Me (which we'll talk about in a minute), and the other button is Message.
Figure B
Figure B
There are two buttons above the "Slide to answer" control.
When you tap Message, you'll have access to the all of the messages that you typed into the Settings. However, if you didn't specify any custom messages, you can use the default ones that are included in iOS 8. If you still need to type something even more customized, you can tap the Custom button and send a full iMessage to the caller (Figure C).
Figure C
Figure C
You can tap the Custom button and send a full iMessage to the caller.
Whenever you tap any of the pre-populated messages, it's automatically sent to the caller without any other steps necessary.

Get reminders to call back

What if you get a call and, instead of sending a text message back to the caller, you want to get a reminder to call the person back after a set period of time? Well, iOS can handle this too.
Simply press the Reminder button (Figure D) when a call comes through, and then select a time. This will add a reminder to the Reminders application so that you'll receive a notification to call the person back after a set time / location.
You can select to have a reminder, "In 1 hour," "When I leave," and "When I get home."
Figure D
Figure D
Easily get a reminder to call someone back using the Reminder button.
What other tips do you recommend for managing incoming phone calls on iOS? Let us know in the discussion thread below.