Showing posts with label wifi. Show all posts
free public wifi
There
are thousands of companies around the world that provide free internet
access, you can use these networks , especially in the travel , without
the need to use 3G or other connection .
1 wifi
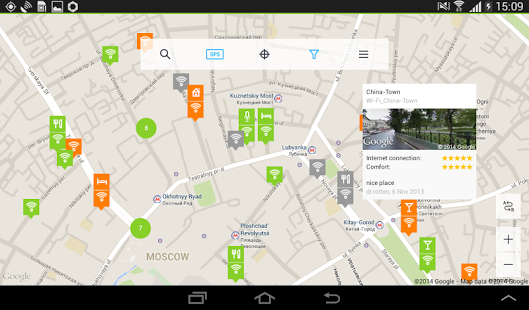
osmino: FREE WiFi Lite - lightweight version of the legendary app osmino WiFi. This is a free WiFi access around the world - more than 12 million wifi hotspots. With the help of this easy WiFi-manager you can automatically join free WiFi and share public and private WiFi networks. Automatic search and connection to public WiFi networks start with one tap. No any complicated settings nor terms. You can check the nearest public hotspots on our WiFi hotspot map.
You get an automatic access to available WiFi. Without having to know any parameters and network settings – osmino WiFi will do it for you.
You can also share the password to a known WiFi network and make it available to other osmino users, just select "Share" and agree by filling check box.
Information about public hotspots is automatically set on map, according to the data received from users’ devices. When you connect to any public network we receive on our server the network location, name and access settings and automatically show it on the map.
This is how we create the use-proven public WiFi hotspots map based on users’ data. The more users subscribe to osmino, the more disposable wifi hotspots appear on the map.
2 Free Zone - Free WiFi Scanner
Access free internet anywhere using Wi-Fi hotspots with FreeZone.
Automatically discover which free Wi-Fi hotspots really work.
Use passwords shared by others and access Wi-Fi hotspots in bars, restaurants, malls, and other public places.
You'll be automatically notified when you're in range of a free Wi-Fi hotspot.
See a map of places near you that offer free Wi-Fi.
Instant access to more than 5 million Wi-Fi hotspots!
1 wifi
osmino: FREE WiFi Lite - lightweight version of the legendary app osmino WiFi. This is a free WiFi access around the world - more than 12 million wifi hotspots. With the help of this easy WiFi-manager you can automatically join free WiFi and share public and private WiFi networks. Automatic search and connection to public WiFi networks start with one tap. No any complicated settings nor terms. You can check the nearest public hotspots on our WiFi hotspot map.
You get an automatic access to available WiFi. Without having to know any parameters and network settings – osmino WiFi will do it for you.
You can also share the password to a known WiFi network and make it available to other osmino users, just select "Share" and agree by filling check box.
Information about public hotspots is automatically set on map, according to the data received from users’ devices. When you connect to any public network we receive on our server the network location, name and access settings and automatically show it on the map.
This is how we create the use-proven public WiFi hotspots map based on users’ data. The more users subscribe to osmino, the more disposable wifi hotspots appear on the map.
2 Free Zone - Free WiFi Scanner
Access free internet anywhere using Wi-Fi hotspots with FreeZone.
Automatically discover which free Wi-Fi hotspots really work.
Use passwords shared by others and access Wi-Fi hotspots in bars, restaurants, malls, and other public places.
You'll be automatically notified when you're in range of a free Wi-Fi hotspot.
See a map of places near you that offer free Wi-Fi.
Instant access to more than 5 million Wi-Fi hotspots!
Share a hard drive with everyone on your Wi-Fi network
By reseausale. 6:34 PM
Cloud Computing, Cloud storage, computer, hard drive, network, networking, Share a hard drive with everyone on your Wi-Fi network, wifi, windwos
Take advantage of your router's USB port with a little trick that lets you share a hard drive with anyone on your Wi-Fi network.
Cloud storage is expensive, but it's not the only way to share a bunch of files across many devices. Instead, you can use an external hard drive and your router to create networked storage accessible to anyone on your Wi-Fi network.
When it's set up, any files stored on that drive can be accessed by all devices on your network -- even phones and tablets. Here's how to set it up on Windows.
Step 1: Choose your drive
The drive you share can be as small as thumb drive, or as large as a 3TB external hard drive. Check your router's manual to find out if there are any storage limitations, since some routers have a storage cap.Once you've chosen your drive, plug it in.
Step 2: Enable USB drive sharing
On any computer connected to your Wi-Fi network, launch a browser, and navigate to your router's IP address. You can find this on the back of the router, in the device manual, or by searching for it online. In most cases, it looks like 192.168.X.X.When the page loads, you'll be asked to log in with your username and password. If you changed it, you should know it. If you didn't, it's probably still admin (username), and admin (password).
Those who fall into the latter category, please change your password as soon as you can, and before proceeding to the next step.
Every router's interface is different, but if yours has a USB port, you'll find a link entitled something like File Sharing under the Administrator settings. In this window, enable the file sharing server (also called SAMBA). Apply the settings, and exit.
Step 3: Access the drive
You're now ready to read and write to your attached hard drive. Open a file explorer window, and navigate to the Network folder in the left sidebar. Then, clear out the path at the top of the explorer window, and enter \\[your IP address]. So, for example, it might look like: \\192.168.1.1If you plan on leaving your hard drive attached, so that you can easily access it from any Explorer window. To do that, right-click the drive and select "Map network drive..." Give it a name, and the folder will appear in the sidebar.
Tags: windwos, network, hard drive, Cloud storage, computer, Cloud Computing, networking
How to Setup a Static IP Address on the Samsung Galaxy S4
By reseausale. 5:08 PM
How to Setup a Static IP Address on the Samsung Galaxy S4, IP address, s4, Samsung Galaxy S4, wifi
Having problems with the Wi-Fi internet on your Samsung Galaxy S 4?
Are you getting an “Obtaining IP address” message but cannot get your
phone to connect to your home network or router? Setting up a Static IP
address on your Android Smartphone might be the solution to your
problem. This article is a step by step guide with pictures showing how
to setup a Static IP Address on the Samsung Galaxy S 4.
This guide can also be used as a reference for other brands of Android Smartphones running on Android Version 4.2 Jelly Bean (or similar Android OS versions) as well.
How to setup a Static IP Address - Android Version 4.2
Quick Instructions:
Settings > Connections tab > Wi-Fi > Select the Network (hold down) > Modify network config > Show advanced options > IP settings > Static > Type in desired network information > Save.Detailed Instructions with Pictures:
Tap the Menu key under the devices display (bottom left).
Tap Settings.
Make sure that the Connections tab is selected (upper left).
Tap Wi-Fi.
Tap and hold the Network that you want to use a Static IP Address on until additional options appear on the display.
Note: if you see a “Forget” option then you didn’t hold your finger down on the network long enough.
Tap Modify network config.
The phone will display 2 available options. Show password and Show advanced options.
Tap Show advanced options.
To adjust your Proxy Settings.
Note: you do not need to change the proxy settings
on your phone in order to set a static IP address. But I am going to
briefly demonstrate the process should you choose to do so.
Tap on the Proxy settings option shown, the default is usually set to none.
Select Manual.
Scroll down and enter the information for the Proxy you would like your phone to use.
To set your static IP Address
Tap IP settings.
DHCP is often the default setting used.
Select Static.
Tap on the fields that you want to edit and set manually.
Type the desired information provided by your ISP (Internet Service Provider).
Click Save.
Best tips for using your smartphone
By reseausale. 7:58 PM
DropBox Cloud Back-up, smartphone, Top tips for using your smartphone abroad, wifi
When jetting off on holiday our smartphones and tablets are top of
the list of things to pack, but there’s a lot to consider when taking
this type of technology on your travels. So, with the holiday season
looming, we thought it only right to bring you this handy guide.
Not only will it ensure you get the most out of your mobile while you’re away, but it’ll also show you how to avoid any of those dreaded data costs.
Data costs have dropped a great deal over the last few years, but remember you will be charged much more when travelling outside of the EU.
You can do this on iOS by heading into the Settings menu > Mail, Contacts, Calendars > Fetch New Data or simply switch off Mobile Data to restrict all data, including push notifications, to Wi-Fi only.
Android users should go to Settings > Accounts > Sync and turn off Auto Sync.
To
save journey’s offline type in where you want to go, then once it’s
been found clear the search bar and enter ‘OK maps’. It’s as easy as
that.
Not only will it ensure you get the most out of your mobile while you’re away, but it’ll also show you how to avoid any of those dreaded data costs.
Back everything up
In case your belongings get lost or damaged while you’re away from home, it’s always a good idea to keep your content backed up. Whether it’s pictures, messages or contacts,
cloud storage
systems like Dropbox and Google Drive are on hand to keep your mobile
life safe, secure and within easy reach, even when you don’t have your
phone on you.
Switch off Data Roaming
This may seem like an obvious suggestion, but it’s surprising how many people forget to switch off their Data Roaming, amidst all the excitement of going on holiday. Data Roaming is when you use another mobile network to access the internet on your phone. The company that owns that network will then bill your provider, who in turn bills you. By switching this off your phone will automatically stop your device from connecting to the web and running up a big bill.Data costs have dropped a great deal over the last few years, but remember you will be charged much more when travelling outside of the EU.
Turn on Wi-Fi
Should you need to access the internet or your emails, switch on Wi-Fi and connect to one of the hotspots in the area where you’re staying. Whether it’s in your hotel, a local cafĂ© or restaurant, they’re everywhere these days, so make the most of them.
If
the Wi-Fi you’re connected to is not password protected we advise that
you don’t use things like your banking app. Because the hotspot is open
it’s even easier for hackers to intercept your confidential information.
Disable push notifications/ auto-syncing
If your smartphone alerts you as soon as you have new mail or a Facebook request this is using up data and will need to be switched off when abroad to avoid extra charges.You can do this on iOS by heading into the Settings menu > Mail, Contacts, Calendars > Fetch New Data or simply switch off Mobile Data to restrict all data, including push notifications, to Wi-Fi only.
Android users should go to Settings > Accounts > Sync and turn off Auto Sync.
Download before you go
Whether it’s books, apps, music or films you want to get on your phone, make sure you download them at home before you jet off. Downloading files abroad and trying to stream things like videos consumes large amounts of data. Also, any files that aren’t fully downloaded will be ‘stored’ and resume as soon as they find an internet connection at your destination – so keep your eye on this.Know your surroundings
You’ll no doubt want to venture away from the hotel at some point during your holiday, and your smartphone is there to ensure you don’t get lost. If you don’t already have it, download Google Maps and save your routes offline.
Do
this at home before you go, if you can, alternatively hook up to a
local Wi-Fi connection and download them while you’re away.