.
Showing posts with label iphone. Show all posts

Respond to calls with text messages in iOS

Pro tip: Respond to calls with text messages in iOS
Have you ever been in the middle of a call, only to be interrupted by another call coming in? It can be annoying, especially as the other caller hears the "buzz" of the iPhone silent ringer. Sure, you could enable Do Not Disturb mode before making your first call, but why not do something a little more reactive instead? Let's take a look at how to set this up so that you can easily send a message with one tap to a caller to let them know if you're busy or on another call.

Setting up call messages

By default, iOS 8 comes with a few reply messages pre-populated into the software. However, if you want to customize the messages that are available to you, simply follow these steps:
  1. Open Settings | Phone | Respond with Text
  2. Type in your messages into the Respond With fields (Figure A)
Figure A
Figure A
Type in a message that will be displayed to incoming calls.
Note: You can type up to three different messages in this area. You'll be able to choose between these three messages with only a single tap when you receive a phone call.
The default messages are: "Sorry, I can't talk right now," "I'm on my way," and "Can I call you later?" However, you can make these messages say anything you want.

Replying with messages to callers

Whenever you receive a call, there are two buttons above the "Slide to answer" control (Figure B). One of those buttons is Remind Me (which we'll talk about in a minute), and the other button is Message.
Figure B
Figure B
There are two buttons above the "Slide to answer" control.
When you tap Message, you'll have access to the all of the messages that you typed into the Settings. However, if you didn't specify any custom messages, you can use the default ones that are included in iOS 8. If you still need to type something even more customized, you can tap the Custom button and send a full iMessage to the caller (Figure C).
Figure C
Figure C
You can tap the Custom button and send a full iMessage to the caller.
Whenever you tap any of the pre-populated messages, it's automatically sent to the caller without any other steps necessary.

Get reminders to call back

What if you get a call and, instead of sending a text message back to the caller, you want to get a reminder to call the person back after a set period of time? Well, iOS can handle this too.
Simply press the Reminder button (Figure D) when a call comes through, and then select a time. This will add a reminder to the Reminders application so that you'll receive a notification to call the person back after a set time / location.
You can select to have a reminder, "In 1 hour," "When I leave," and "When I get home."
Figure D
Figure D
Easily get a reminder to call someone back using the Reminder button.
What other tips do you recommend for managing incoming phone calls on iOS? Let us know in the discussion thread below.

Best free apps for iphone

best iphone apps


the 1O top and best free iPhone apps, and includes iPhone app for social networking, travel, news, photography, productivity, shoping, sport,

TeeVee 3

Storehouse

Duolingo

Periscope

whatsapp

viber

Messenger

temple run

temple run 3

temple speed


 best ios apps, best iphone apps, apps

How To Use Apple Pay To Buy Things With Your iPhone

Your iPhone may some day be the only device you need to purchase products and services, but first you need to start using Apple Pay.

Over three years ago, I replaced my wallet with my iPhone and a case, which holds up to three debit cards. Now I look forward to the day when I don’t have to carry physical cards at all. Apple Pay and other similar services may ultimately make that happen. Here’s how to set up the service on your supporting Apple device.

What Is Apple Pay

Apple Pay is an iOS 8 service supported only on the iPhone 6, 6 Plus and the forthcoming Apple Watch that allows customers to pay  for merchandise and services using their qualifying and installed debit and credit cards. iPad Air 2 and iPad mini 3 owners can use Apple Pay to pay for goods within apps, but not in bricks and mortar stores.

At this time, only the following banks and credit card networks (including Visa, MasterCard, and American Express) support Apple Pay:

Apple Pay banks 640x306   How To Use Apple Pay To Buy Things With Your iPhone
Apple Pay is not supported by PayPal, and it only currently works with U.S. banks. Also, at this time, Apple Pay can be used in about 50 national store chains, including McDonald’s, Apple Store, Wallgreens, and Macy’s. No supermarket chains, besides Whole Foods Market, have signed up, nor is Walmart supporting Apple Pay.

Setting Up Apple Pay

Setting up Apple Pay is a straight forward process. If have you have a supported credit/debit card, add it to your device by opening the Settings app, and tapping on Passbook & Apple Pay > Add Credit or Debit Card. You can either scan the card, or if that doesn’t work, input the transaction data yourself.

Apple Pay setup   How To Use Apple Pay To Buy Things With Your iPhone
After your cards are added, they will show up in the default Passbook app, which can also include other iOS Passbook supported apps, such as Starbucks, United Airlines, Target, and the event finder app, Eventbrite.

Passbook1   How To Use Apple Pay To Buy Things With Your iPhone

Using Apple Pay

Apple Pay works within supporting retail stores that have a near-field communication (NFC) device installed. The NFC terminal works similar to a credit card scanner, but customers don’t have to swipe their cards. To use the remote transaction, look for an Apple Pay icon on the payment system at the cash register.
apple pay icon1   How To Use Apple Pay To Buy Things With Your iPhone
Point your iPhone or other supporting device toward the machine to pay for the merchandise. Apple Pay will pop up and request your touch ID for okaying the transaction. You don’t need to open Passbook, and your device doesn’t even need to be awake when it integrates with the NFC terminal. After the transaction is complete, you’ll feel a little vibration on your device to indicate the completion of the process.

2014 11 05 18 53 08   How To Use Apple Pay To Buy Things With Your iPhone

In the three instances I’ve used it so far, there was one occasion when the transaction still required me to punch my passcode numbers in on the machine, instead wirelessly taking care of the entire process remotely.

A Word About Security

Not only is the Apple Pay process convenient for not having to pull out your card to pay for items, it also provides extra security measures that shields your card number and PIN from other merchants and scanning machines. Your credit card numbers are not even stored on Apple’s server. Instead, the process involves assigning a unique, encrypted Device Account Number in a dedicated chip within your device.
Touch ID also brings added security, because it prevents a thief from accessing your device, unless he or she knows your passcode number. If you want, you can disable access to Apple Pay and Passbook when your device is in locked position.

Wallet Free?

So does Apple Pay mean you won’t need to carry your credit or debit cards? Unfortunately not at this point. The payment process is not yet supported by many of the stores and services you use on a regular basis, including most supermarkets, gas stations, local shops, and so on.
I still keep my cards with my iPhone using the DistilUnion wallet case, and I have a photo of my driver’s license on my phone. My physical driver’s license, which I rarely have to use, is tucked securely away secure in my car.

Distil Union Wally iPhone Wallet Brown Pull Tab new 072b1d0a b49a 48b5 8149 a69793b878bf 1024x1024   How To Use Apple Pay To Buy Things With Your iPhone
Apple Pay also doesn’t keep track of your spending, so you might want to make use of a personal finance service like Mint.com.
Have you tried Apple Pay yet?

How to Use iPhone as Modem

n today's fast-paced life, waiting to connect to the Internet even for a minute seems like eternity. Many of you must be traveling due to several work reasons and may require Internet connection at any given point. Let's say you're at the airport, waiting to catch a plane. You have your laptop with you and it's vital that you send certain documents right away. The airport doesn't have proper Wi-Fi or wireless Internet access connectivity but your cell phone does; wouldn't that be the best deal? Wondering how to use iPhone as a modem? Read on to find out.


Use iPhone as Modem for Laptop

Along with other useful iPhone apps, the device can be used as a attached modem for your PC or laptop. Before using iPhone, you need to first enable it via iPhone dock-connector-to-USB cable. If your phone has a 3G connection, you can even make and receive calls on your phone while using it as a dial-up modem. The directions aren't very long or tedious. All it takes is few simple steps and you'll be good to go.

  1. iPhone to USB cable
  2. Data plan
Step #1 ~ First and foremost, make sure that tethering has been enabled on the phone. What this means is, your other devices will be able to receive the Internet connection made available by an Internet-capable cell phone.

Step #2 ~ On your iPhone menu, go to Settings icon. The location of your "Settings" icon will be different as you can change it as per your own requirements. So it could be on the first page of the menu or somewhere else. If you're new to iPhone, this icon looks gray in color and has a cogs design. Click on Settings icon.

Step #3 ~ Now you need to go to the page where all the other subcategories are. So go to General category which will be towards the bottom of the phone's screen. The icon has similar markings as the Settings menu. Click on General and then click on Network subcategory.

Step #4 ~ After the Network icon, click on Internet Tethering option. Slide the option from Off to On. The Off icon is gray in color, and once you slide it to On icon, it will turn blue. This is where you have activated your iPhone to work as a modem.

Step #5 ~ Next, connect your cell phone with the laptop with the iPhone to USB cable. Once you connect the cable, a pop-up window will appear prompting you for approval. Click on iPhone and then select Apply. Your laptop has been connected to the Internet.

Step #6 ~ You have successfully turned your device into a modem. Now you can launch the web browser for quick Internet access. You can easily check the connectivity on the desktop toolbar, located on the bottom-right side of the screen for Windows and top-right side of the screen for Mac.

See, was that difficult? All you have to do is follow few necessary steps and you'll be online in no time. You can also read about how to set up Wi-Fi. In order to maintain Internet connection, you need to make sure that the USB cable is intact. If you turn your phone off, the Internet connection will be disconnected. So, make sure it has enough battery life and stays on at all times. The connectivity needs to be strong so that you can work online without any disturbances.

iPhone Says 'No SIM Card Installed'?

Time and again, Apple's flagship iPhones have come under the radar of the 'gadget police' and have been criticized for their design flaws. The most recent recurrence of this was when it was reported that the recently-released iPhone 6 handsets tend to bend because of intolerance to heat and pressure, that too when they are stored in the owner's pocket! When after spending exorbitant amounts of money on an exquisite mobile phone, that is the object of envy to everyone else, it is literally disappointing when it does not fulfill the basic purpose of utility.

While Apple works on improving upon its phone design, some of the people who own older iPhone 3G, 4, 4S, 5, 5C, and even 5S models are suffering from a common affliction; the "No SIM Card Installed" problem. If you are one of them, you need not despair, because we have the way you can fix it right here.


Detailed Analysis and Solutions

Did your iPhone, one fine morning, randomly declare that you have "No SIM card installed" on your device? You have every reason to be upset; however, by approaching the problem in a systematic, step-by-step manner, you can easily get to the root of the matter.

SIM Card Troubleshooting

Did you recently switch from a different mobile handset to an iPhone? And while doing so, did you yourself convert your SIM card to its smaller-sized counterpart by cutting it yourself? If the answer to any of the above is affirmative, chances are, you may have damaged your SIM card and need to request your carrier for a new one.
Even if you have no direct involvement in your SIM card's possible malfunctioning, it could have been damaged because of reasons like overheating. You could check if your SIM card is still a valid one, by inserting it into a different handset, that supports the same size of SIM card. If it is working there, then the key to this issue lies elsewhere.
You could also try to insert a completely different, compatible, and tested-to-be-working SIM card into the same device, and see if your iPhone recognizes it. If so, then the problem can be consolidated to your particular SIM card.
Maybe your SIM card genuinely has not been inserted correctly. Carefully remove your SIM card from your phone, by using a paper clip to pop out the SIM card tray. Then, reinsert it into the tray, and reboot your phone. If your SIM card has been positioned properly this time, it will be read, and your device will acknowledge it.
Maybe your SIM card is simply clouded with dirt or grime, or there may be fingerprints on the metallic chip, and that may be the reason that your device is unable to recognize it. To solve this problem, isolate it from the device once more, and using rubbing alcohol, clean the side that has the chip. Allow it to dry completely before you re-insert it.

Other Troubleshooting

Your SIM card physically may have nothing to do with the reason behind it not being recognized by your phone. The answer may lie with your device, firmware, or network connectivity.
If you are not able to connect to your network sometimes, your phone may assume that your SIM card is not valid. This happens with phones of all brands. Turn on the Airplane Mode of your phone, and after a few minutes, turn it off again. This will refresh your connectivity. You could also reboot your device entirely.
Check for any available carrier settings update. This can be done by opening Settings General About. If there is any update available, you will get to know it here.
Make sure that the SIM card tray of your iPhone is the one that came with the device when you purchased it from the vendor, and not the one you seated your SIM card on, when you inserted it into the iPhone you used earlier. Different iPhone models have differently manufactured SIM card trays.
Is your firmware up-to-date, or are you using an older version of iOS? Make sure you update your device to the latest version.
If your iPhone was functioning properly a couple of hours ago, and is displaying this suddenly, once you have ruled out the SIM card itself as a cause, but you are unable to pinpoint its actual cause although you are certain it is system-software related, the easiest thing to do is to restore your iPhone to a backed up version in which your SIM card is recognized.

The Last Resort

If none of the above methods result in the "No SIM Card Installed" problem's resolution, you may be facing this problem because of a design flaw that is present in many iPhone devices.
The SIM card tray's ejecting mechanism has a metal face, and sometimes, it comes in direct contact with the metallic part of the inserted SIM card (the chip), causing a short circuit to occur. As a result of this, it will not be possible for the device to recognize your SIM card.
To resolve this, a method employed by many frustrated, yet innovative users is to stick a small piece of Scotch tape (or any kind of tape) on the side of the SIM card tray. This will serve the purpose of isolating the SIM card from the metal part of the mechanism, and allow your device to recognize it, resolving the problem

The problem will most probably be resolved if you follow our step-by-step guide. However, if it still persists, you could contact Apple Support, or take it down to the nearest iStore. If the problem of SIM card failure occurs due to the design flaw, and your iPhone is still under warranty, you could in fact get the device itself replaced.

How to Detect and Remove Spyware from Your iPhone

How to Detect and Remove Spyware from Your iPhone
This article is for all those people whose iPhone is being accessed by their jealous or possessive significant other, or by a friend, boss, or relative who has always been nosy into their private affairs. There is a great possibility of your iPhones being jailbroken, in order to use it to spy on you.

Installing spyware on an iPhone can provide access to the victim's text messages, call logs, e-mails, banking passwords, and even the current location can be traced with a spyware.

Technology has improved and upgraded to such an extent that these days, people don't even know by whom are they being watched. Did you know that people who secretively install spyware software on the phone, are in most cases, the ones whom the victim trusted the most and least expected to spy on his or her private life? The fact that iPhone does not have any software, which can detect such spyware, is all the more threatening.

But hey, relax! Here we will not only tell you how to understand if your iPhone is being used to spy on you, but also methods for removing spyware from your iPhone. The most important aspect while detecting spyware on an iPhone is to recall if the iPhone had physical access by a second person. Spyware can be installed by a person with an average knowledge about jailbreaking. This procedure does not take more than 5 minutes.

Signs that Your iPhone has a Spyware Installed

☞ Watch out for unexplained heating up of the iPhone even when not in use and poor battery backup in spite of frequent charging of the phone. The reason for poor battery levels is that a lot of data has to be monitored by the spyware and sent to the installer's phone. This recedes the battery life.

☞ Check if your display screen shows a data transfer icon even when the data transfer is ticked 'off' and the Internet is not in use. If it does, the possibility of the spyware being installed shoots up all the more.

☞ Freezing of the iPhone, sudden shutdowns, slow restarts, excessive usage of Internet data, and huge bills for texts and calls, which don't match the rate of utility of the iPhone, is another shout out from your phone, indicating that something's wrong.

☞ Look for signs of jailbreak and search for the Cydia App (software which allows the jailbroken iPhone to install apps) icon on your home screen. If this app doesn't show on the home screen, then search for it in "applications." Nevertheless, if you yourself have jailbroken your phone in the past, then this pointer for detecting spyware should be avoided.

Show the Spyware its Way Out

☞ They say, prevention is better than cure. So, always keep your iPhone password protected. From your display screen to all the other applications, make sure that you keep everything protected with a password. And if possible, try keeping your phone to yourself and don't let it out to people, unless there is an emergency.

☞ Delete applications and programs that are not installed by you. But updating or clearing data will not solve the entire problem. Sync your data, for example, your contacts, and photos (not your applications) with iTunes. Now, with the help of iTunes, restore your data. This way, all your data and purchased applications will be restored. The reason for not syncing your applications with iTunes is that, doing so will take a backup of the spyware as well.

☞ Avoid jailbreaking your iPhone. iPhones that are jailbroken are more susceptible to spyware. Always have an antivirus installed in your iPhone.

☞ To conclude on the pointers of removal of spyware from an iPhone, remember that a simple update of the iOS will paralyze the spyware, rendering it useless.

So the next time you feel that you are being spied on, you definitely know how to ward off the trouble. Removing spyware from an iPhone is easy, but we suggest that always secure your phone with tricky passwords and stay away from your possessive exes
Read more at Buzzle: http://www.buzzle.com/articles/how-to-detect-and-remove-spyware-from-your-iphone.html

How to use iphone 6

  iPhone 6 wow !!!

Apple’s new iPhone 6 and iPhone 6 Plus both sport large screens which can make using them with one-hand a bit problematic. With that in mind, we want to show you how to easily use the iPhone 6 and the iPhone 6 Plus with one hand.

Before the arrival of the iPhone 5 in 2012, the iPhone had always used a small 3.5-inch display. Even as Android manufacturers shifted to massive displays for their flagship smartphones, Apple held firm. Even last year’s iPhone 5s came with a small 4-inch Retina Display. This year though, Apple finally caved and delivered the large screens many consumers have been craving for years.

Last week, Apple released the iPhone 6 and iPhone 6 Plus, two new flagships that replace the iPhone 5s as the company’s flagship iPhone. Both are in possession of powerful features including massive Retina HD displays. The iPhone 6 sports a 4.7-inch display while the iPhone 6 Plus comes with a much larger 5.5-inch display. These new displays are fantastic for gaming, watching video, and using iOS 8 but they come with a cost.
haw to use iphone 6

That cost? Ease of use. Apple’s 3.5-inch and 4-inch iPhones are extremely easy to use with one hand, the larger iPhone 6 models will take some adjustment. Apple of course was, and is, aware that people want to use their phone with one hand. Even large screen smartphones like the iPhone 6 and the massive iPhone 6 Plus. So, it baked in a feature that’s going to help many of you use the iPhone 6 and even the iPhone 6 Plus with just one hand.

iOS 8, the iPhone 6′s operating system, comes with a feature called Reachability (We’ve also seen it referred to as One-Handed Mode). Reachability is a small iOS feature that’s tucked away inside iOS 8′s settings. The feature is turned on by default though many iPhone 6 and iPhone 6 Plus users are not aware of its presence. Here, we’re going to show you how to use Reachability for better one-handed use and we’re going to show you how to toggle it on or off in case you want to do that. Let’s start with how it works.
Reachability is extremely basic but it’s going to help many of you access what you need with just one hand. To use the feature, simply tap on the home button twice. Do not press it down, simply tap on it. Once you do that, you should get a screen that looks like the one below.


Whatever is on the screen will be pushed down so that you can easily access the upper right hand corner with your thumb. Applications like Google Chrome store vital functionality in the top right corner and Reachability will allow for easier access with one-hand. To get out of the iPhone 6′s one-handed mode, you can double tap again or simply tap on something on screen.


haw to use iphone 6
 If you find yourself double tapping on accident, there is a way to quickly, and easily, turn the feature off. To turn off Reachability, head to Settings > General > Accessibility > Toggle On/Off Reachability. You’ll need to scroll down a bit to find it but it’s there. Once it’s turned off, you will no longer have access to the one-handed mode.

This is a feature that is going to be extremely useful for those of you that are in possession of an iPhone 6 or iPhone 6 Plus and small hands. It’s not perfect by any means but it has the potential to be come a part of your daily routine. It has already become part of ours.

haw to use iphone 6  and iphone 6 plus

iphone 6

iphone 6


iphone 6

iphone 6

iphone 6iphone 6


iphone 6 sizer

iphone 6

How do I set up my email account on an iPhone?

 Step by step instructions for setting up an email account on an iPhone.

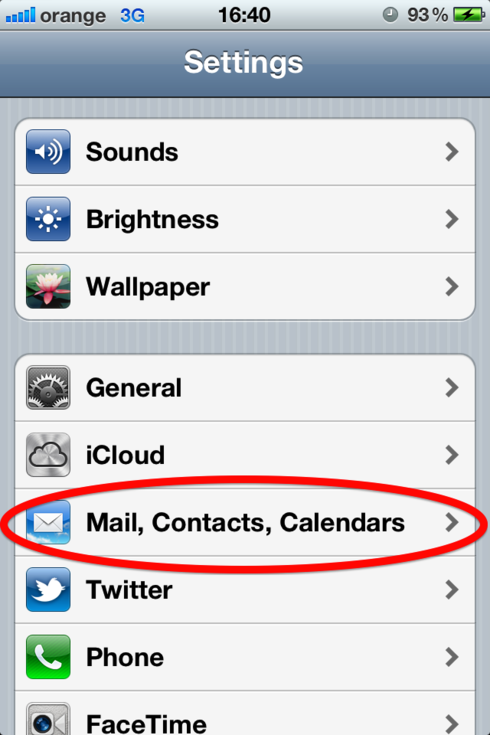
1. Tap on Settings on your home screen

2. Go to "Mail, Contacts, Calendars"

 How do I set up my email account on an iPhone?

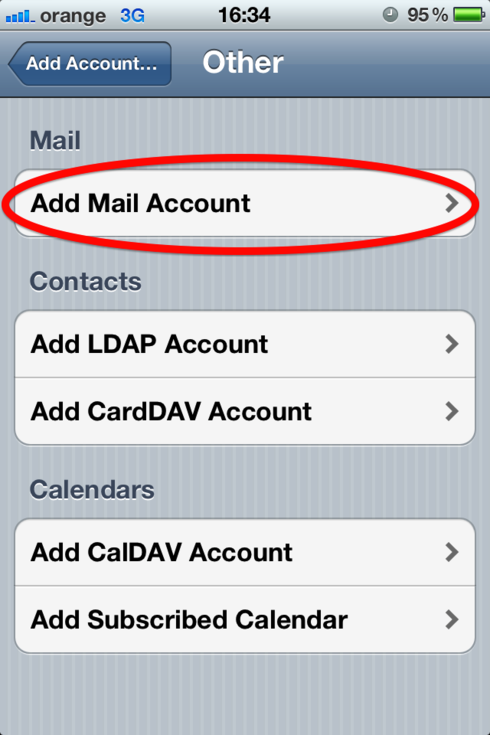
3. Tap on "Add mail account"

 How do I set up my email account on an iPhone?

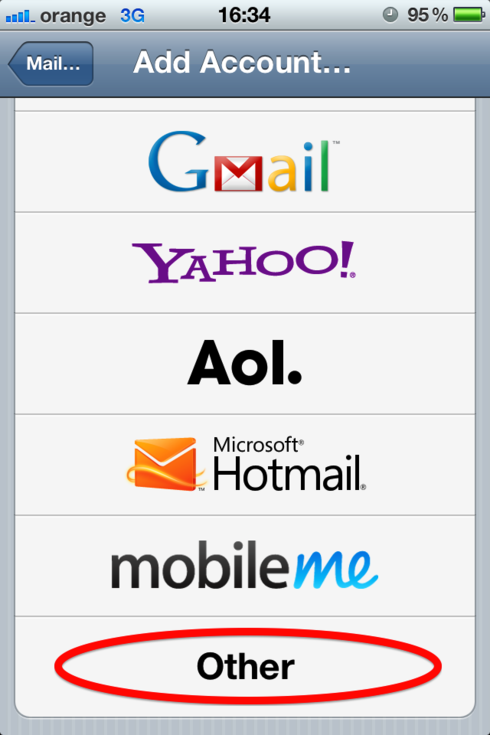
4. Select "Other" from the email providers list

 How do I set up my email account on an iPhone?

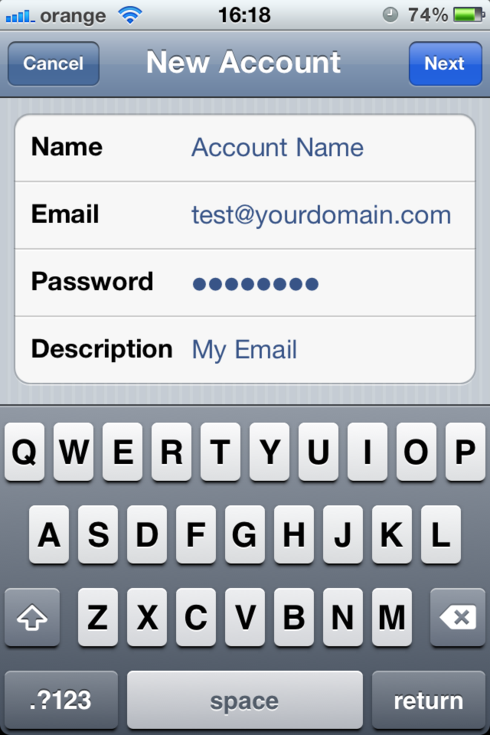
5. Fill out the required information

Name: Just name your account however you want
Email: Your liveBooks email address
Password: The provided password for your address
Description: You can type in whatever you want

 How do I set up my email account on an iPhone?

6. Tap "Next"
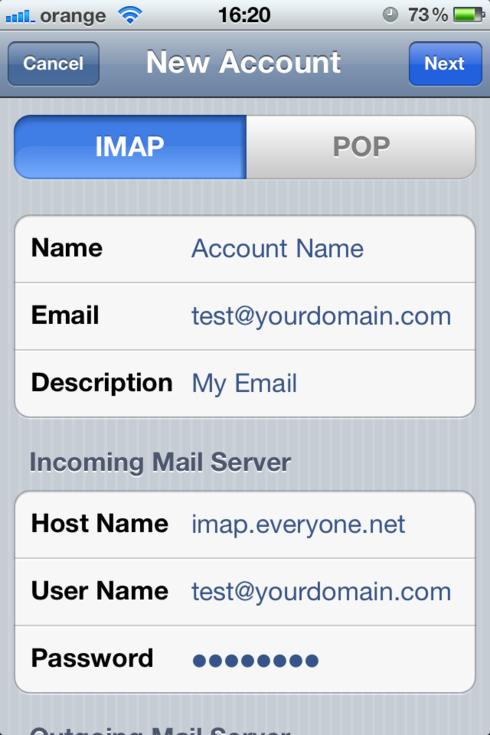
7. Make sure the IMAP account type is selected at the top

 How do I set up my email account on an iPhone?

In the "Incoming Mail Server" section:

Host name: imap.everyone.net
Username: Your full email address
Password: The corresponding password

In the "Outgoing Mail Server" section:

Host name: smtp.everyone.net
Username: Your full email address
Password: The corresponding password


8. Tap "Next"
9. Select where you want your emails to show


10. Tap "Save"

After the account is created you can click on the new account and check the Advanced settings:

Make sure the SSL is ON
Authentication set to Password
And the incoming server port is 993


Please make sure that you turn ON the SSL and set the authentication method to "Password" for the Outgoing mail server as well.

poul

samsung or iphone ??