.

How to Setup a Static IP Address on the Samsung Galaxy S4

Having problems with the Wi-Fi internet on your Samsung Galaxy S 4? Are you getting an “Obtaining IP address” message but cannot get your phone to connect to your home network or router? Setting up a Static IP address on your Android Smartphone might be the solution to your problem. This article is a step by step guide with pictures showing how to setup a Static IP Address on the Samsung Galaxy S 4.
This guide can also be used as a reference for other brands of Android Smartphones running on Android Version 4.2 Jelly Bean (or similar Android OS versions) as well.

How to setup a Static IP Address - Android Version 4.2

Quick Instructions:

Settings > Connections tab > Wi-Fi > Select the Network (hold down) > Modify network config > Show advanced options > IP settings > Static > Type in desired network information > Save.

Detailed Instructions with Pictures:

Tap the Menu key under the devices display (bottom left).
How to Setup a Static IP Address on the Samsung Galaxy S4
Tap Settings.
How to Setup a Static IP Address on the Samsung Galaxy S4
Make sure that the Connections tab is selected (upper left).
Tap Wi-Fi.

Tap and hold the Network that you want to use a Static IP Address on until additional options appear on the display.
Note: if you see a “Forget” option then you didn’t hold your finger down on the network long enough.


Tap Modify network config.


The phone will display 2 available options. Show password and Show advanced options.


Tap Show advanced options.


To adjust your Proxy Settings.

Note: you do not need to change the proxy settings on your phone in order to set a static IP address. But I am going to briefly demonstrate the process should you choose to do so.
Tap on the Proxy settings option shown, the default is usually set to none.


Select Manual.


Scroll down and enter the information for the Proxy you would like your phone to use.

To set your static IP Address

Tap IP settings.

 DHCP is often the default setting used.


Select Static.


Tap on the fields that you want to edit and set manually.


Type the desired information provided by your ISP (Internet Service Provider).
Click Save.

SuperSU 2.01 update gets support for Android L Developer Preview

SuperSU 2.01 update gets support for Android L Developer Preview
Chainfire’s SuperSU app has been updated today to build in support for the Android L developer preview. Before now, rooting the developer preview involved a few workarounds with custom boot images so root permissions should work properly, but that should all be fixed up now.
If you’ve been using the L developer preview, have you tried rooting it yet, or are you fine with using a non-rooted device?

How to install Viber on PC no need Smartphone verified account?

Viber has just released 3.0.0 version with many advanced features (such as allows for sending video messages, the new design,…) and also launched Viber for desktop on Windows OS and Mac OS. That means now you can text and receive messages on both your smartphone/tablet and your PC desktop.
But if you don’t have a Viber account which verified (active) on smartphone/tablet, you can’t use Viber on your desktop. It’s really a bad luck for who aren’t using smartphone or tablet.
active viber PC desktop
This article, I will tell you how to install Viber on desktop without a Viber verified-on-smartphone/tablet-account. The summary idea of the article is running viber on a virtual machine and get the activation code on a real phone number, then using that phone number to active Viber desktop. And that means you don’t need to have a smartphone or tablet, what you need is:
1. Google account
2. A valid phone number
3. An Android virtual machine (BlueStacks, Android SDK Manager, AndroVM,…)

I recommend using BlueStacks just because BlueStacks is a simple and strong Android virtual machine but there is no need to config the software.

Install Viber on BlueStacks

Once you have BlueStacks installed, on the main screen of BlueStacks, click on the Search button and type “Viber” on the search box and hit on the first result (named Viber : Free Calls & Messages)
install viber desktop
Click on the first result (Viber : Free Calls & Messages)
BlueStacks will redirect to a popup which you will click on the Viber: Free Calls & Messages under the bag with Android icon on to install Viber from Google Play.
install viber desktop android virtual
Click on the icon under bag of Android icon
At this step, you will have to log in your Google account. Click on Install button on Google Play to install Viber.

Active Viber on Virtual Machine

After installing Viber on BlueStacks, you will have to active it with a valid phone number.
If Viber request access your address book and sync your contacts list, click OK

active viber desktop
Click on Continue button and enter your valid phone number
Click on Continue button, then enter your valid phone number. In a jiffy, you will receive a SMS from Viber to inform you about your activation code. Enter your activation code and now your phone number is your Viber ID.

Using Viber Desktop

Viber desktop is now active on both Windows OS and Mac OS. Download Viber Desktop here.
After installing Viber desktop, the Viber screen shows you: “Do you have Viber on your mobile phone?”, click on Yes
active viber on PC desktop
Click YES
Then enter your phone number as your Viber ID.
Now, turn to BlueStacks, you will receive a message from Viber informs you the Activation code for Viber Desktop. Likes this:
Activation code viber desktop
Enter the code to Viber desktop and click Enter Viber
Active Viber Windows OS
Click Enter Viber
Then:

Now you can start to using Viber Desktop but no need a viber account on mobile phone first, without smartphone and tablet!

How do I set up my email account on an iPhone?

 Step by step instructions for setting up an email account on an iPhone.

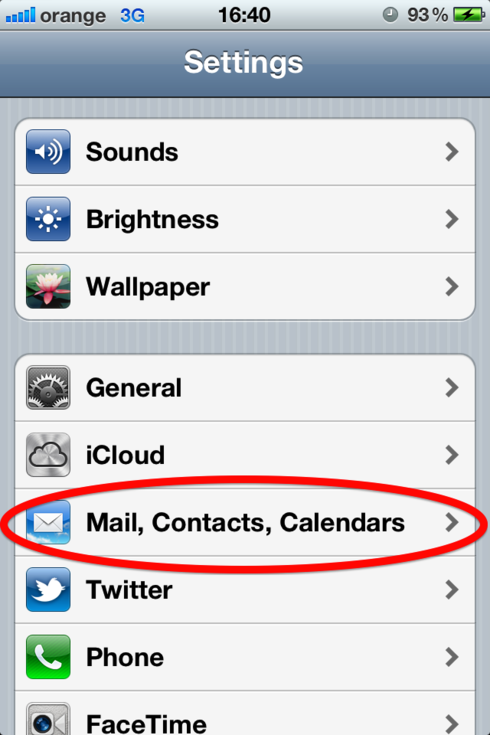
1. Tap on Settings on your home screen

2. Go to "Mail, Contacts, Calendars"

 How do I set up my email account on an iPhone?

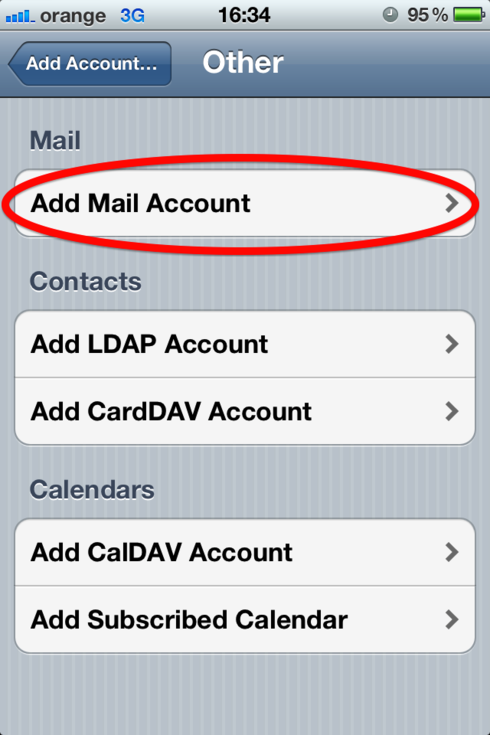
3. Tap on "Add mail account"

 How do I set up my email account on an iPhone?

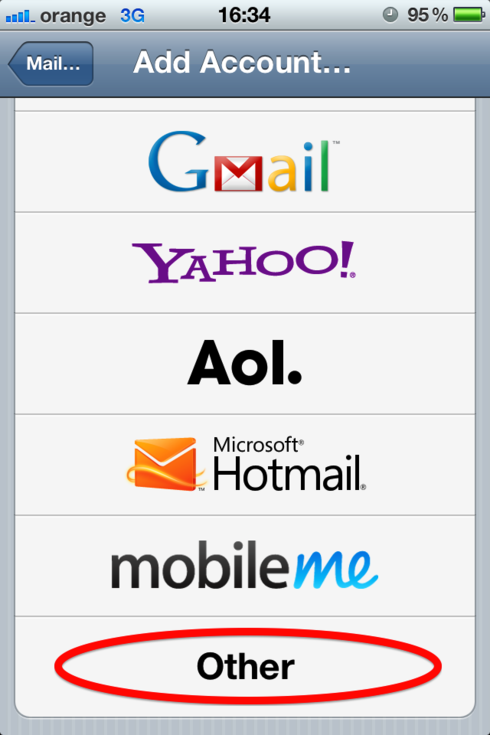
4. Select "Other" from the email providers list

 How do I set up my email account on an iPhone?

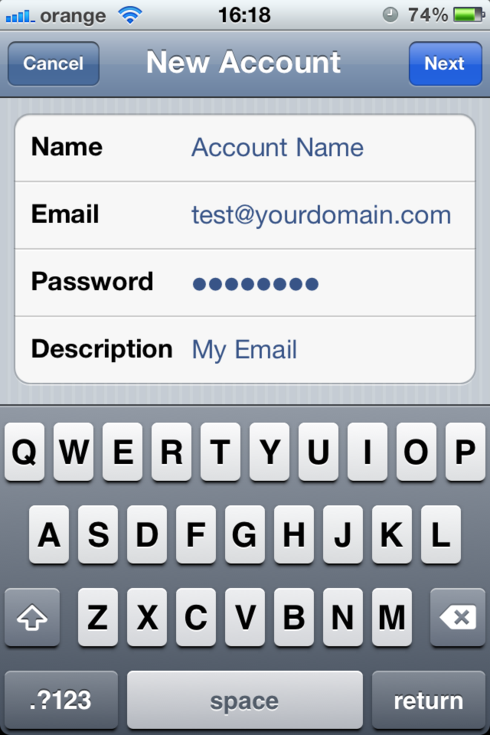
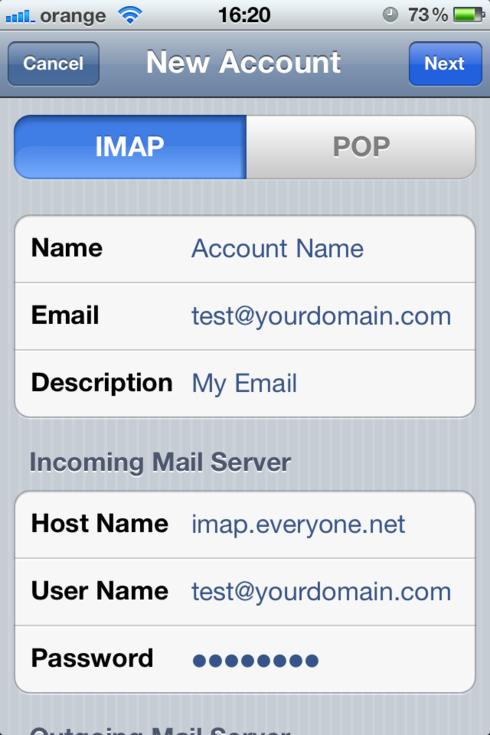
5. Fill out the required information

Name: Just name your account however you want
Email: Your liveBooks email address
Password: The provided password for your address
Description: You can type in whatever you want

 How do I set up my email account on an iPhone?

6. Tap "Next"
7. Make sure the IMAP account type is selected at the top

 How do I set up my email account on an iPhone?

In the "Incoming Mail Server" section:

Host name: imap.everyone.net
Username: Your full email address
Password: The corresponding password

In the "Outgoing Mail Server" section:

Host name: smtp.everyone.net
Username: Your full email address
Password: The corresponding password


8. Tap "Next"
9. Select where you want your emails to show


10. Tap "Save"

After the account is created you can click on the new account and check the Advanced settings:

Make sure the SSL is ON
Authentication set to Password
And the incoming server port is 993


Please make sure that you turn ON the SSL and set the authentication method to "Password" for the Outgoing mail server as well.

How to enable Location Services on an iPhone or an iPad

How to enable Location Services on an iPhone or an iPad

 
How to enable Location Services on an iPhone or an iPad
 
If you have previously answered “No” to the question “Do you authorize “Michelin” to use your location data?”, or if you have disabled the geolocation option, you can enable the “Locator Service” on your iPhone or iPad by following the procedure below:

From the main screen of your iPhone® / iPad:


     - Click on “Settings” > “General” > Location Services

 
     - Enable the “Location Services” (“ON”); 


How to enable Location Services on an iPhone or an iPad


     - Enable (“ON”) or disable (“OFF”) the “Location Services” for each of the applications featured on the screen that require this service;


     - Return to the menu screen and launch the application of your choice

How to Configure Wireless Network Step by Step

We have covered all CCNA exam topics in our wireless networking section. As its new topic in CCNA exam so you have very little chance to get simulated base question on wireless networking. Still we recommended you to get familiar with some basic wireless configuration.

Step by Step guides For wireless configuration

Download this topology and load it in packet tracer
Download File
wireless network

In this topology we have three pc connected with Linksys Wireless routers.
  • DHCP is configured and enabled on Wireless router
  • IP pool for DHCP is 192.168.0.100 to 192.168.0.150
  • PC are configured to receive IP from DHCP Server
  • No security is configured
  • Default SSID is configured to Default
  • Topology is working on infrastructure mode
  • Default user name and password is admin
  • IP of wireless is set to 192.168.0.1
Now your task is to:-
  • Configure Static IP on PC and Wireless Router
  • Change SSID to MotherNetwork
  • Change IP address of router to 10.0.0.1 and 10.0.0.2 of PC0 10.0.0.3 of PC1 10.0.0.4 of PC2
  • Secure your network by configuring WAP key on Router
  • Connect PC by using WAP key
To complete these tasks follow this step by step guide of how to configure wireless network
As given in question our network is running on 192.168.0.0 network and all PC's are DHCP clients and functioning properly. So we will first connect to Wireless router to off DHCP.
Double click on PC and select Web Browser. As given in question IP of Wireless router is 192.168.0.1 so give it in Web browser and press enter, now it will ask for authentication which is also given in question. Give user name admin and Password to admin
How to Configure Wireless Network Step by Step
This will bring GUI mode of Wireless router. Scroll down screen to Network Step and Select Disable DHCP

How to Configure Wireless Network Step by Step
Go in end of page and click on Save setting this will save setting click on continue for further setting
configure wireless device
Now select Administration from top Manu and change password to test and go in the end of page and Click on Save Setting
wireless device set password
Click on continue for further setting. This time it will ask you to authenticate again give new password test this time
wireless set password
Now click on wireless tab and set default SSID to MotherNetwork
wireless ssid
Now Select wireless security and change Security Mode to WEP
configure wireless security
Set Key1 to 0123456789

Again go in the end of page and Click on Save Setting
Now we have completed all given task on Wireless router. Now configure the static IP on all three PC's
Double click on pc select Desktop tab click on IP configuration select Static IP and set IP as given below
PCIPSubnet MaskDefault Gateway
PC0192.168.0.2255.255.255.0192.168.0.1
PC1192.168.0.3255.255.255.0192.168.0.1
PC2192.168.0.4255.255.255.0192.168.0.1
Now it's time to connect PC's from Wireless router. To do so click PC select Desktop click on PC Wireless
wireless devices
Click on connect tab and click on Refresh button
wireless connect
As you can see in image that Wireless device is accessing MotherNetwork on CH 6 and signal strength is 100%. In left side you can see that WEP security is configured in network. Click on connect button to connect MotherNetwork
It will ask for WAP key insert 0123456789 and click connect
wireless key
It will connect you with wireless router.
As you can see in image below that system is connected. And PCI card is active.
wireless pc connected
Repeat same process on PC1 and PC2.

Graphics cards - Nvidia’s audacious attempt to make life easier for PC gamers


LAS VEGAS— Nvidia CEO Jen-Hsun Huang talked here in Vegas about his company’s cloud-based system for helping gamers tweak their PCs for the best graphics possible.
The GeForce Experience, as it’s called, sounds a little like one of those crazy bungee jumping affairs you find when on vacation, but it’s really a stab at making life less confusing for PC gamers trying to navigate the complexities of PC game settings.
Since PC gaming is the fastest growing segment of the largest entertainment medium today, ensuring a smooth game experience is in the best interest of gamers and Nvidia, the largest purveyor of discrete graphics chips in the world.

Game setup is hard

Playing a PC game out of the box often yields a low resolution, muddy mess. A few games attempt to set optimized resolution, but game developers often can’t account for the vast range of performance differences that exist in today’s PCs. Add in gamers who might be playing on years-old hardware, and it’s impossible for a single game company to intelligently adjust settings for all possible system configurations. The configuration screens in games are often a messy collection of acronyms and technical jargon, which prevents many users from intelligently adjusting their own settings.
Nvidia CEO Jen-Hsun Huang speaking at CES.
CEO Huang set the stage, noting how PC gaming is different from console gaming. A high-end gaming PC might offer 15 times the performance of an Xbox 360 console, while a low-end PC might eke out barely half the performance of the same console. PC games include the ability to alter game settings to get better quality graphics or tweak the games performance, but its too complicated for most gamers. PC game settings are a blessing and a curse, Huang noted.
Nvidia has access to a wide array of data on PC gaming platforms, going back to the early days of the GeForce GTX graphics engines. We went out and tried to understand every single PC configuration in the world and every single game setting in the world, Huang said. Given the companys history of working with both game developers and end users, the company is uniquely positioned to understand all the vagaries of different PC systems.
Nvidia spent years collecting and analyzing a vast amount of performance data on PC games. They studied the impact of various in-game graphics settings on performance. This included data collected over multiple generations and price points of GeForce-based graphics cards, as well as a broad range of PC CPUs.

Automated game settings from the cloud

The GeForce Experience is a cloud service integrated into upcoming GeForce Drivers. Nvidia developed algorithms to automatically set game performance based on the configuration data the company collected over the years. GFE analyzes a computers settings, including graphics, CPU and memory, and automatically injects the settings into the users games. So users don’t need to navigate complex graphics settings to make changes to game settings. Nvidia tested a vast array of settings on thousands of PC configurations to make sure they actually delivered an optimal gaming performance.
Huang showed footage of Call of Duty: Black Ops 2 running without the GeForce settings, then enabled GeForce Experience with a single click and showed the improvement. The differences were very noticeable: Frame rate remained smooth, while graphics detail and overall resolution improved.
         Gaming graphics before "GeForce Experience" settings applied.
The screenshot before GFE is applied is blurry, with objects not well defined. When the GeForce Experience is applied, the image looks crisper, with higher detail on the object and crisper edges and outlines.
           Gaming graphics after "GeForce Experience" settings applied.

Bottom line: PCs as game consoles

The GeForce Experience is currently in closed beta, with no formal release date announced. Jen-Hsun Huang said that the primary goal of the GeForce Experience is console simplicity with PC performance.
That’s an admirable, insanely ambitious goal, but Nvidia’s never lacked for ambition. If the GeForce Experience can come close to its stated goal of making PC game settings as easy as console games, then PC gamers everywhere will be much, much happier. The one exception to this will be users who are running AMD Radeon graphics chips. The GeForce Experience will be built into Nvidia drivers, and will work only on systems running Nvidia-based graphics cards.
And in the end that’s the real bottom line: more Nvidia GPUs in more PCs.