How to run Windows XP programs in Windows Vista, Windows 7 and Windows 8
Microsoft has killed support for Windows XP, but that doesn't mean
you have to get rid of all your old software. Here we show you how to
run Windows XP programs in Windows Vista, Windows 7 and Windows 8. Also see: Windows 10 hands-on review and Windows 10 release date, price and new features.
If you still have a few legacy applications that require Windows XP
or you just want to test a program to make sure it works on the legacy
operating system, it’s relatively simple to install and run it in a
virtual PC environment. Also see: How to install a virtual machine.
Windows XP is no longer available to buy and although there are
illegal copies to be found circulating the internet, you can download a
pre-built virtual PC directly from Microsoft, which you can be confident
will be malware-free. Microsoft provides these virtual machines to help
developers test old versions of Internet Explorer, but they provide a
full XP environment in which you can run any programs you wish.
Virtual PCs are available for a number of platforms, but we’ll use
Oracle’s free VirtualBox software in this example. Once you have
VirtualBox installed and working, go to modern.ie
and select ‘VirtualBox on Windows’, then scroll down to Windows XP.
Download the three files listed under IE8 and save them to a folder on
your hard drive. Once they have downloaded, run the file called
part1.exe and it will extract a file called IE8 – WinXP.OVA.
Double-click this file to import it into VirtualBox and your Windows XP
virtual PC will be installed.
You can now launch Windows XP from within VirtualBox and install any
software you wish. The operating system is time limited to 30 days, but
it’s possible to activate it for permanent use if you are in possession
of a valid key
tags:
How to run Windows XP programs in Windows Vista, Windows 7 and Windows 8
Every
operating system needs an occasional repair job, and Windows 7 is no
exception. Whether the source of the problem is corrupt data, a
particularly brutal piece of malware, or some other serious issue,
you'll occasionally have to reinstall your copy of Windows.
Wiping your hard drive and performing a fresh installation can be a huge
headache; but fortunately there's a way to repair a corrupt Windows 7
installation while keeping all your programs, personal data, and user
accounts intact. With Windows 7 you can perform an in-place upgrade
installation to repair a flaky existing install. Though technically
designed to upgrade older Windows operating systems like Vista, the
in-place upgrade installation option can also be used to repair an
existing installation of Windows 7.
The
in-place Upgrade installation involves multiple stages, starting with
copying installation files to the destination drive and gathering
existing files and settings.
Note that you must perform the in-place upgrade process from within
Windows; if your PC can't fully boot to the Windows desktop, this repair
guide is not for you. A few other limitations come up later in the
article, so be sure to read the entire guide thoroughly before
attempting to repair your corrupt copy of Windows 7. Performing a repair
installation should be your last resort, and you should consider it
only if you have already removed spyware from your PC, reinstalled your drivers, and unsuccessfully tried to restore from an earlier (working) version of Windows 7 using System Restore.
Prepare Your PC for Windows 7
Before performing a repair installation, you should take a few
precautionary measures to ensure that the process goes smoothly. The
first step is to back up all of your critical files to an external
storage device. Though the repair process is unlikely to fail or to
render any of your files unrecoverable, it's always a smart idea to back up your data.
After you've backed up your system's important data, we recommend
uninstalling any third-party security software such as firewalls or
antivirus applications. You can always reinstall them after completing
the repair process; but since you'll be initiating this process from
within Windows, you need to remove any security applications that
actively scan files. You should also download and store all of the
drivers that your system needs to function--especially the network
controller, which tells your network adapter how to access the Internet.
After backing up all of your drivers, clean out all of the temporary
files and junk data that have accumulated in Windows 7 over the course
of prolonged use. To do this, click the Start button, and in the Search field type Folder Options; then press Enter. In the Folder Options window, click the View tab and select Show hidden files, folders and drives; then click OK.
Next, initiate a Disk Cleanup by opening the Start menu and selecting Computer; right-click your primary drive (the C: drive by default) and open the Properties menu. Select the Disk Cleanup utility in the lower-right portion of the menu, and select Clean up system files. The Disk Cleanup utility should take a few moments to rescan the drive. Next, click the More Options tab, and select Clean Up in the 'System Restore and Shadow Copies' section at the bottom of the menu. In the dialog box that appears, click the Delete button; then navigate back to the Disk Cleanup tab, confirm that all items in the Files to Delete list are checked, and click OK.
The Disk Cleanup utility should clear out outdated system files,
temporary data, and other digital detritus. Depending on how much junk
data is on your drive, this step may take anywhere from a few seconds to
a few minutes.
After running the Disk Cleanup utility, you should clean out a few
folders manually. Open the C: drive again, and double-click the Windows
folder. Scroll down the list of folders and delete any files in the
Prefetch and Temp folders. Be sure to delete only files within those two
folders and not the folders themselves. Next, navigate back to the C:
drive, and double-click the Users folder. Within the Users folder, double-click first the folder for your particular username, and then the AppData folder (if you don't see the AppData folder, you must not have selected 'Show hidden files, folders and drives' earlier), the Local folder, and finally the Temp folder. Delete all of the files in this Temp folder as well; then restart your system.
The following instructions assume that your wireless card and
connection profiles (SSID) are controlled by Windows 7 "WLAN AutoConfig"
system service. If your wireless card and SSIDs are managed by some
other utilities, then please consult the instructions for your
particular utility.
1. Open the Control Panel window.
2. In the Control Panel window, the exact
arrangement of the items in the window may be different than the picture
here, depending on what view is chosen in the Control Panel window. In
the Large Icon or Small icon view, click on the Network and Sharing Center icon.
3. In the Network and Sharing Center, click on the Set up a new connection or network link.
4. The Set Up a Connection or Network dialog will appear. Click on the Connect to the Internet item to highlight it. Then click on Next.
5. If you are already connected to a network via a wired or wireless
connection you'll see a dialog indicating that an Internet connection
already exists. Click on Set up a new connection anyway. The Connect to the Internet dialog will appear.
6. If you don't have an existing connection, the Connect to the Internet dialog will appear.
7. Click on the Wireless item. The dialog will
disappear, and a menu of wireless networks will appear in the lower
right corner of the screen. You should see the three Caltech wireless
networks (Guest, Registered and BeaverNet). You may
also see other networks as well. These are temporary conference networks
for specific groups on campus. You should not try to connect to these
networks unless you have received instructions to do so from the
conference organizer.
8. To connect to the Registered network, click on the Caltech Registered item in the wireless network menu. The item will expand.
9. Click on the Connect button to create a connection. The menu will disappear and a Connecting to Caltech Registered progress dialog will momentarily appear.
10. If the connection to Caltech Registered has been successful, the Network and Sharing Center will be updated with the status of the network connection.
You should now have a successful connection to the Registered network.
Microsoft Windows 7 is the latest version of Microsoft Windows
operating system. Compared to its predecessor Windows XP and Vista,
Windows 7 is more powerful and more secure
Unlike Windows XP, Windows 7
adopted a new password protection system that we can't use the hidden
administrator account by default. The problem is that when Windows 7
administrator password lost, we can no longer recover our lost password
by using the hidden administrator account. Therefore, how to recover the
Windows 7 Admin password if we lost or forgot it?
Don't worry, here are two methods for Windows 7 administrator password recovery:
Method one: Use another Windows 7 administrator account
If
you had created more than one administrator account on your Windows 7
computer and you can remember the others admin password, you are lucky.
In such a case, you can change one of the administrator accounts'
password if you login with another administrator account. What you need
to do is just following these 3 easy steps:
Step 1: Click Start -> Control Panel -> Add or remove user accounts
Step 2: Choose the locked administrator account.
Step 3: Click Change the password or Remove the password. And then you can change or remove the lost or forgotten password.
Please
note: If you select this method, the locked Windows 7 administrator
account will lose all EFS-encrypted files, personal certificates, and
stored passwords for Web sites or network resources.
However, if the locked account is the unique administrator account on your Windows 7 computer, you can try the method below.
Method two: Use third party Windows password recovery software
There
is plenty of software which is used to recover Windows password
available online. You can choose one of them to create a Windows
password recovery disk and use the disk to recover Win 7 Admin password.
Then you can follow these 4 easy steps:
Step 1: Download the software and install it on another computer which has a CD/DVD writer.
Step 2: Run the software and burn the ISO image file into a blank CD/DVD.
Step 3: Recover Windows 7 administrator Password with nearly burned password recovery disk.
Step 4: Reboot your locked computer without a password required.
Now
you can regain access your Windows 7 operating system and create a new
administrator password. The best thing of using this method is that you
shouldn't lose any data on your computer. Furthermore, If you can't find
a computer which has a CD/DVD writer or the locked computer have no a
CD-ROM, You can burn the ISO image file into a USB flash drive and use
the USB flash drive to recover your Windows 7 administrator password.
Try
these two methods the next time you lose or forget your Windows 7
administrator password, which you do not need to reinstall Windows
system for getting back to Windows by removing lost or forgotten
password.
How to recover windows 7 administrator password? This article is about windows 7 administrator password recovery.
Article Source: http://EzineArticles.com/4375999
watch this video How to recover windows 7 administrator password?
1. A Windows 7 .iso file.
2. A USB stick with enough room for said operating system (4GB should work but I'd recommend just getting an 8GB stick).
3. Windows 7 USB/DVD Download Tool. Link for free program: http://download.cnet.com/Windows-7-USB-DVD-Download-Too...
Now to get started with the installation.
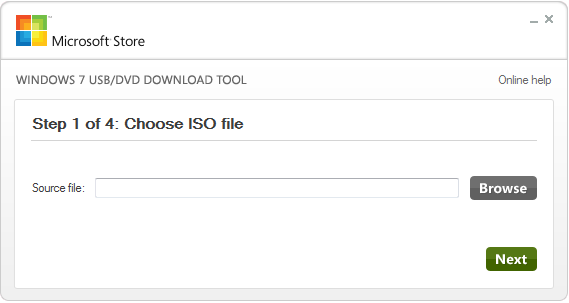
Step 1: Open your Windows 7 USB/DVD Download Tool program. It should look like this:
Step 2: Click the "Browse" button > Locate your .iso file > Click Open.
The file will now be listed in the "Source file:" line. Click Next.
Step 3: Now you have the option to put the
operating system on your USB device or burn it to a DVD. For the
purpose of this tutorial, we will put it on the USB device. Click USB device.
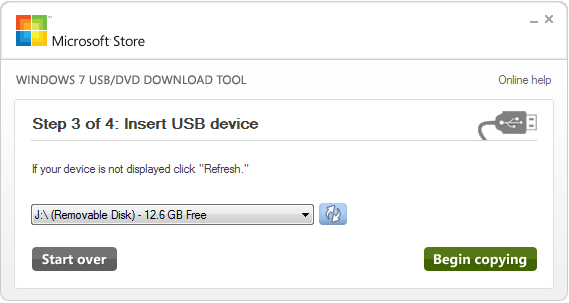
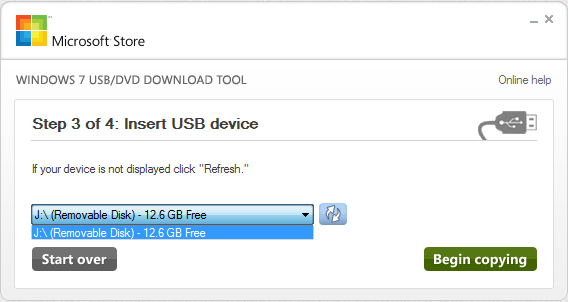
Step 4: Select your USB device in the list (it will probably already be selected but if it is not, click the down arrow and ensure you are installing your operating system on the right device).
Warning:
The USB stick will have its contents deleted when you make it
bootable. Ensure that any files you have on that USB stick are backed
up or they will be lost.
If your USB device is empty then it will not give you the "Erase USB Device prompt so simply continue by pressing "Begin copying".
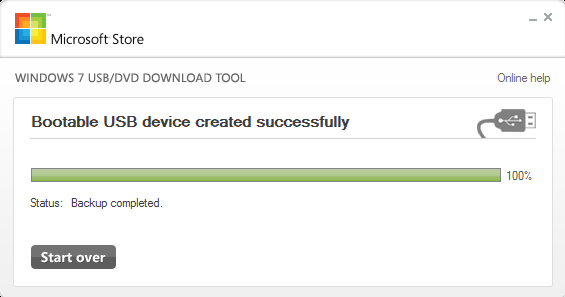
Step 5: The program will create the bootable USB device.
When it is finished, the Status line will read "Backup completed". Close the program.
Red more :
By default, Windows 7 does not show hidden files. Sometimes, however, you may actually need Windows 7 to show the hidden files and folders on your computer.
If you need to manage files under a hidden folder, you'll need to be
able to view that folder. You may also need Windows 7 to show hidden
files so you're able to delete one, maybe to solve some kind of problem
you're having.
No matter the reason, configuring Windows 7 to show hidden files and folders is really easy.
Difficulty: Easy
Time Required: Configuring Windows 7 to show hidden files and folders usually takes less than 5 minutes
Here's How:
Click on the Windows 7Start button and then on Control Panel. Tip: In a hurry? Type folder options in the search box after clicking Start. Choose Folder Options under Control Panel from the list of results and then skip to Step 4.
Click on the Appearance and Personalization link. Note: If you're viewing the Large icons or Small icons view of Control Panel, you won't see this link. Simply click on Folder Options and proceed to Step 4.
Click on the Folder Options link.
Click on the View tab in the Folder Options window.
In the Advanced settings: area, locate the Hidden files and folders category. Note: You should be able to see the Hidden files and folders category at the bottom of the Advanced settings: text area without scrolling down. You should also see two options under the folder.
Choose the Show hidden files, folders, and drives radio button under the Hidden files and folders category.
Click OK at the bottom of the Folder Options window.
Close the Control Panel window that's still open.
You will now be able to view all files and folders with the hidden
attribute turned on, as well as drives hidden in Windows 7.
You can test to see if hidden files are now being shown in Windows 7 by navigating to the C:\ drive. If you see a folder named ProgramData, then you are now able to view hidden files and folders. Note: You might notice that the icons for hidden files and
folders are slightly grayed out. This is an easy way to separate hidden
files and folders from your normal unhidden ones.
Tips:
If you no longer wish to see them, you can always hide hidden files in Windows 7.
Not a Windows 7 user? See How Do I Show Hidden Files and Folders in Windows? for specific instructions for your version of Windows.