.
Showing posts with label hdd. Show all posts

Difference between SAS and SATA hard drives


Difference between SAS and SATA hard drives

Both SATA and SAS use only 7 wires for data, compared to the older generation Parallel-ATA, which uses 40. This greatly reduces the amount of crosstalk generated due to electromagnetic interference between the conducting wires, simplifying the circuit design.
In today's world, it is all about 'big data'. The new-age trend is to take all the hard (real world) entities and make it into soft (digital world) entities. With more and more information being dumped in the digital world these days, its storage has become an issue. And, it's not just at the enterprise level. Home users too are demanding larger and better storage options for the increasing size of their personal data.

Thankfully, technology has managed to keep pace with this growing demand, and there are plenty of options out there for every conceivable purpose. SATA and SAS are the two main technologies that have been the key players in the hard disk drive market. Each of these technologies has both, advantages as well as drawbacks. But which one is right for your particular application? Let's find out.

Introduction

SATA is the abbreviation of Serial Advanced Technology Attachment. This technology was introduced in 2001. As the name suggests, it employs serial signaling technology, unlike the older generation PATA (Paralled-ATA) technology.

The use of serial technology brought with it two major benefits. One being that, SATA cables are thinner, requiring lesser number of wires. Also, their connectors are smaller. The second is that, SATA cables can be made much longer, without becoming too pricey. SATA cables are used to interconnect the various peripherals inside a computer. Hard disk drives incorporating SATA technology are usually internally connected via cables to the motherboard. However, since 2004, modern computers usually have an external eSATA port for plugging an external SATA HDD.

SAS stands for Serial Attached SCSI (Small Computer Systems Interface). It was introduced at around the same time as SATA, and it too was intended to act as a replacement for PATA.

Like SATA, SAS too utilizes serial technology, making their cables and connectors lee bulky when compared to the previous generation parallel technologies. Also, their cables too can be cost-effectively made longer.

Mode of Communication

Communication can be either simplex, half duplex, or full duplex. Simplex communication is uni-directional, which means that one can only talk, while the other can only listen. In half duplex, both communicating parties can either talk or listen, but not at the same time. Finally, in full duplex, both can talk as well as listen simultaneously.

SATA is half duplex, meaning, it can either read data from a peripheral or write data at a time. SAS, however, is full duplex, allowing it to do both, reading and writing simultaneously. Thus, SAS drives have better performance as compared to SATA drives.

Cable lengths

Longer cables have higher impedances. Thus, smaller voltage signals get highly attenuated when transmitted over longer distances.

SAS technology uses higher voltage levels for signaling, as compared to SATA. This allows their data integrity to be maintained over larger distances. Typically, SAS cables can be 10 meters long, while SATA cables are limited to 1 - 2 meters.

Inter-Compatibility

SAS and SATA connectors are almost similar, with each having the same number of pins. Both include power and data connections. However, while in SAS, the data and power sections are both included in a single connector, SATA requires two separate connectors for each.

In SAS HDD, the connector has a small gap separating the power and data sections. This allows either a SAS or SATA connection. However, you will find that this gap is not present in the SATA HDD. This prevents the connection of a SAS connector. Thus, SATA is incompatible with SAS, but SAS is compatible with SATA.

Revolutions Per Minute

Computer HDDs are rotating devices. Their revolutions per minute (rpm) determines the access time of the data on the drive. The more the rpm, the faster the data access, and lower is the required time.

Typically, SAS drives have a much higher rotational speed as compared to equivalent SATA drives. While a standard SATA does 7,200 rpm, SAS drives can go as high as 15,000 rpm, making them significantly faster in terms of data input-output.

Storage Capacities

For the same amount of money, SATA drives will give you much more storage than SAS drives. While the commonly available SAS drives in the market can give you a maximum of 900 GB of storage space, SATA drives can offer up to 3TB, making them 3 - 4 times denser in comparison.

Reliability

The reliability of a hard drive is measured in terms of MTBF (Mean Time Between Failure). The more the MTBF ODF a drive has, the more reliably it will perform.

The MTBF of a typical SAS drive is 1.6 million hours, while that of SATA is 1.2 million hours. Needless to say, SAS drives are much more reliable.

Typical Applications and Cost

SAS drives have better reliability and faster access time, and are used in servers. SATA drives are generally geared towards the consumer market, where performance can be compromised for lowering the cost. SAS drives are much costlier as compared to the SATA drives of the same capacity.

Thus, SATA and SAS technologies have different capabilities and are designed for distinct clientèle. For advanced servers, it is advisable to go in for the SAS drives. But for typical home use, and even for basic servers, the cheaper SATA should suffice

How To Securely Delete Files From Your HDD Or SSD In Windows


When you hit the delete button, where does that file go? Does it just evaporate and leave a blank space on your drive? If you’ve been around computers long enough, you know that’s not what happens. But if you’re mostly an email and Facebook type of computer user, you might not know, or not even thought about it.
You should think about it though, for a couple reasons. The first reason is so that you know you might be able to recover an accidentally deleted file. The second reason is so you know that, if you can recover a file you deleted, so can someone else.

What Happens To A File When It is Deleted

Hard Disk Drives (HDDs)

When you delete a file it goes to the Recycle Bin. That gives you a chance to recover it in case you accidentally deleted it and need it back. But what happens when you delete it from the Recycle Bin? Actually, not much at all. The file doesn’t move or go anywhere. In fact, when you moved it to the Recycle Bin, it didn’t physically move there either. All that happened was an index got updated to say that the file is in the Recycle Bin, not the Documents folder.

The index is called the Master File Table (MFT) for Hard Disk Drives. It looks like this. The left-most column are the block addresses. The middle column shows data in hex code. the right column shows what that data would like as plain text.

master file table example   How To Securely Delete Files From Your HDD Or SSD In Windows

When the file is ‘deleted’ the information stays on the drive, but the MFT is changed to say, “Hey, you know that spot where Secret-File.txt was? Yeah, Computer, you can now put data there if you want. We don’t need it anymore.” Until the computer puts data in that spot, the Secret-File.txt data remains. It could be minutes, days, weeks, or months until that data is overwritten. Kind of like a condemned house sitting on a lot. It’s not usable, but it’s still there until the bulldozer comes and they build something else.
Here’s an example. The left column shows red Xs for MFT locations that have been set to be overwritten, the one with the page icon is marked to stay. The right column shows the data that is still in that location, even though you can’t find it with Windows Explorer. See the problem with ordinary deletes now?

MFT NTFSWalker   How To Securely Delete Files From Your HDD Or SSD In Windows

Solid State Drives (SSDs)

It’s not exactly the same for Solid State Drives. SSDs are always shifting files around, randomly. So, figuratively speaking, if you deleted a file from location 2871, the deleted info may, sooner or later, get moved off to another random location, until at some point in time the SSD decides to finally overwrite that file. How do you target the old file for secure deletion on an SSD, then?

Well, you can’t really. A group of engineers at the University of California studied how difficult it is to erase data from an SSD. Trying to securely erase a single file left behind anywhere from 4 to 75% of the information. And it’s tough on the drive. What you can do is make sure you encrypt your SSD, and make sure that you’ve got an SSD drive with TRIM capability.

got trim ssd   How To Securely Delete Files From Your HDD Or SSD In Windows
This isn’t a problem for most people, but you might be concerned that people could still access that deleted information. Maybe you handle sensitive medical documents, or you’re an international art thief, or just a little paranoid like me. How do you securely get rid of that data, immediately and forever?

What is ‘Secure’?

Before we get into the nuts and bolts of secure data deletion, we need to look at what secure means. Secure means whatever you think it means. If you’re happy with the level of security you have, then it’s secure. If the data you don’t want recovered isn’t life threatening, then the measures you take to delete it don’t need to be as severe as deleting the security codes for the last sample of smallpox off the CDC’s servers.
Let’s take a look at the methods in order of  least secure to most secure. Until we get to entire drive deletion, these methods will only apply to traditional HDDs.

Least Secure Method

Simply delete the file in your Windows Explorer and empty the Recycle Bin. Unless you think someone is going to come along with data recovery software and look for that file in the next week or so, that will probably be secure enough. Examples of information like this could be anything from a silly animated GIF to a letter to your Nan. You really should write to her. She misses you, you know.

salt lake grandma   How To Securely Delete Files From Your HDD Or SSD In Windows

Mildly Secure Method (HDD Only)

As we talked about, overwriting data is a pretty good way to obscure the old data. You can do this on a file by file basis with programs that are commonly referred to as file shredders. Although the interfaces for these utilities can differ, the method of operation is essentially the same – delete the old file, then write zeroes to the places on the HDD where the file used to be. These tools are only mildly secure, because you have to make sure you use them when you need them. If you want to securely delete a file with your Social Security Number on it, but forget to use the shredder, that info will still be sitting on your drive for awhile.

   How To Securely Delete Files From Your HDD Or SSD In Windows

Examples of use for this method is where the person occasionally deals with sensitive information that pertains only to them. It might be the odd copy of a tax return, or a bank statement that you want to delete. That’s where file shredders are most handy.

Moderately Secure Method (HDD Only)

A more moderately secure method to delete information from your drives is to use software that allows you to wipe free space on your drives. CCleaner is a favourite for this task. When you choose the Wipe Free Space option, it writes zeroes to the blocks where files used to be. The difference between this and the shredders is that wiping free space takes care of ALL deleted files. It’s just that little bit more thorough. The catch is that this method takes a fair bit of time and should be scheduled or you’ll forget to do it frequently enough.

CCleaner wipe free space   How To Securely Delete Files From Your HDD Or SSD In Windows

Examples of good uses for this are for people who frequently delete files that are quite sensitive. Maybe they are heavy online bankers or do some online trading. Perhaps they have just backed up their important info to an encrypted external drive and don’t need it on the computer anymore.

Most Secure Method (HDD & SSD)

The most secure methods are really for deleting the entire contents of a drive. Yet again, because of the differences between HDDs and SSDs, the same methods don’t apply to both. Chose the appropriate one for your drive and situation.

Examples where you’d want to go to this level include switching to a new computer which will have the info, but you’re keeping, selling, or disposing of the old computer. Perhaps you are re-purposing a computer from an information-sensitive use to a more day-to-day use.

HDD – Formatting

Formatting is a catch-all term for a few different things. It can mean simply deleting the MFT so it appears like all the data is gone, but it isn’t. It’s still there and intact until overwritten. Or, it can mean true formatting, known as low-level formatting, which overwrites all the data with zeroes. You can’t low-level format your entire hard drive from within Windows. You’ll need a formatting utility that you can boot your computer into, like Darik’s Boot and Nuke.

dariks boot and nuke   How To Securely Delete Files From Your HDD Or SSD In Windows

You might be tempted to choose one of the hardcore multipass methods, but that’s probably going to be overkill. Especially if you want it done quick and don’t want to shorten the life of your hard drive. The RCMP TSSIT OPS-II or DoD Short methods are sufficient. RCMP is the Royal Canadian Mounted Police and the DoD is the British Department of Defence. Good enough for them should be good enough for you.

SSD – Manufacturer’s Utility

Most SSD manufacturers have a utility for managing and securely erasing their SSDs. Tim Brookes was kind enough to compile a list of links for the top manufacturers in his article, How To Securely Erase Your SSD Without Destroying It.

erase ssd intel   How To Securely Delete Files From Your HDD Or SSD In Windows

Download: Intel Solid State Toolbox / OCZ Toolbox / Corsair SSD Toolbox / Samsung Magician / SanDisk SSD Toolkit

Paranoid Method (HDD and SSD)

The National Institute of Science and Technology has a policy to deal with the destruction of extremely sensitive data. It’s even more aggressive than what the RCMP or DoD use, so it will destroy your data to the point where not even Sherlock Holmes riding on Hercule Poirot’s back with Frank Columbo leading them around would get anything out of it.


melted hard disk drive   How To Securely Delete Files From Your HDD Or SSD In Windows

That’s not hyperbole, that’s NIST’s actual standard. Oh, and to meet the grade you have to find a NIST licensed incinerator to do the job. That job in the picture above wouldn’t be good enough.

 What Will You Do?

You’ve got the knowledge and some resources now. It’s up to you what you will do with them. However, if you’re not already using several techniques to keep your information safe from prying eyes, secure deletion shouldn’t be your first concern. If someone already has your info, it doesn’t matter how you delete your copy.

What method do you use to delete files securely? Are you happy with it? Ever not been able to delete a file? Let’s talk about it.


Source: makeuseof

bios change boot order

Looking to change the boot order for your Windows XP or Vista machine? By changing the boot order, you can force your computer to boot from a CD/DVD drive, a floppy drive, or even off the network.
Changing the boot order on a PC is mostly done in order to boot from a recovery disk or from an OEM disk to run some kind of Windows repair software, such as the Recovery Console.

So here are the steps to change the boot sequence for a PC:

Step 1: The first thing you have to do is restart your computer and enter the BIOS. You can enter the BIOS when you see a message such as “Press FX to enter setup” or something similar.

On a Dell machine it’s usually F2, Toshiba is F1 or ESC, HP is F1 or F2, and IBMs usually require you to go to Start, Programs and then Thinkpad CFG to start up in the BIOS.

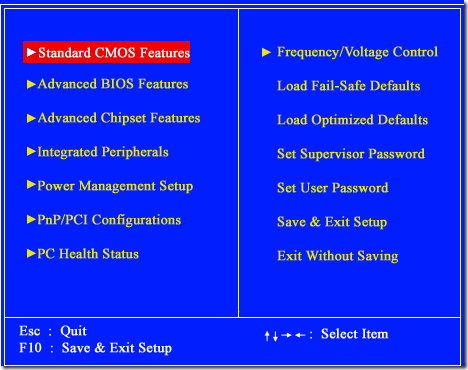
Step 2: Now that you are in the BIOS, the tough part is finding the boot order section. Note that there are not a ton of options in a BIOS, so just go through every page if you have to until you see something like First Boot Device, Boot Order, Boot Management, Boot Sequence, etc.


change boot order

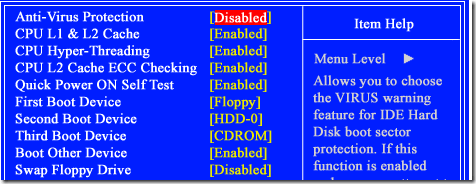
It may also be under Advanced BIOS Features or Advanced Boot Options. In the above screenshot, it’s under Advanced BIOS Features. Use the arrow keys to navigate.

change boot sequence

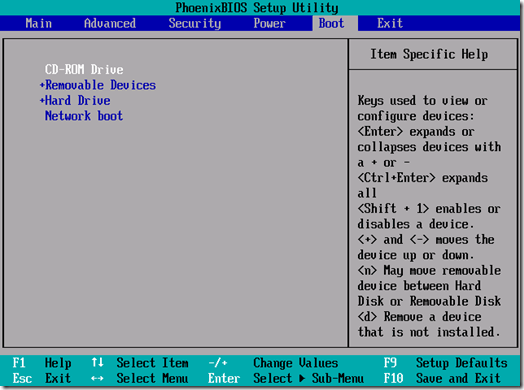
As you can see, there is a First, Second and Third Boot Device. Scroll down and use the arrow keys to change the device to HDD (hard drive), Floppy, CDROM, or Network. You could also have a BIOS that looks like this:

change boot order sequence

The instructions for changing the boot order are in the sidebar, but usually it requires pressing the + or – buttons to move items up and down in the order list. The first item in the list is what will be scanned first when booting. If boot media is not found, it will try the second device and so on.

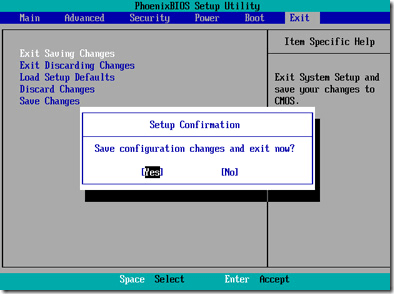
Finally, go to Exit and make sure you choose Yes to the Save configuration changes and exit now? question.

bios boot order

That’s pretty much it! If you have any questions or can’t get into the BIOS on your computer, post a comment here and I will try to help

source :  helpdeskgeek.com

Tags : Windows,boot order,xp,hdd,change the boot order for your Windows XP,BIOS How to Change the Boot Sequence in the BIOS,